This page presents the 15 pictures of Tell Me More in Luftgaukommando Report KU 1679.
By scrolling down the post from top to bottom, you’ll first see images of the two pages in the KU Report listing the captions of the photos.
This is followed by verbatim transcriptions of the entire block of text on those two pages. Each German-language caption is followed by its English-language equivalent, in italics.
Then, scrolling down through all the pictures you’ll see that each photo has its pertinent caption – in both German and English – beneath it. The English-language translations are presented in italics.
Importantly, the images and their captions are not presented in the same numerical order as in the KU Report. Instead, I’ve arranged them to appear as if you were walking along and moving through the plane, from front to rear. I’ve also added some comments below the German-English paired translations.
____________________
KU Report Photo Caption Pages

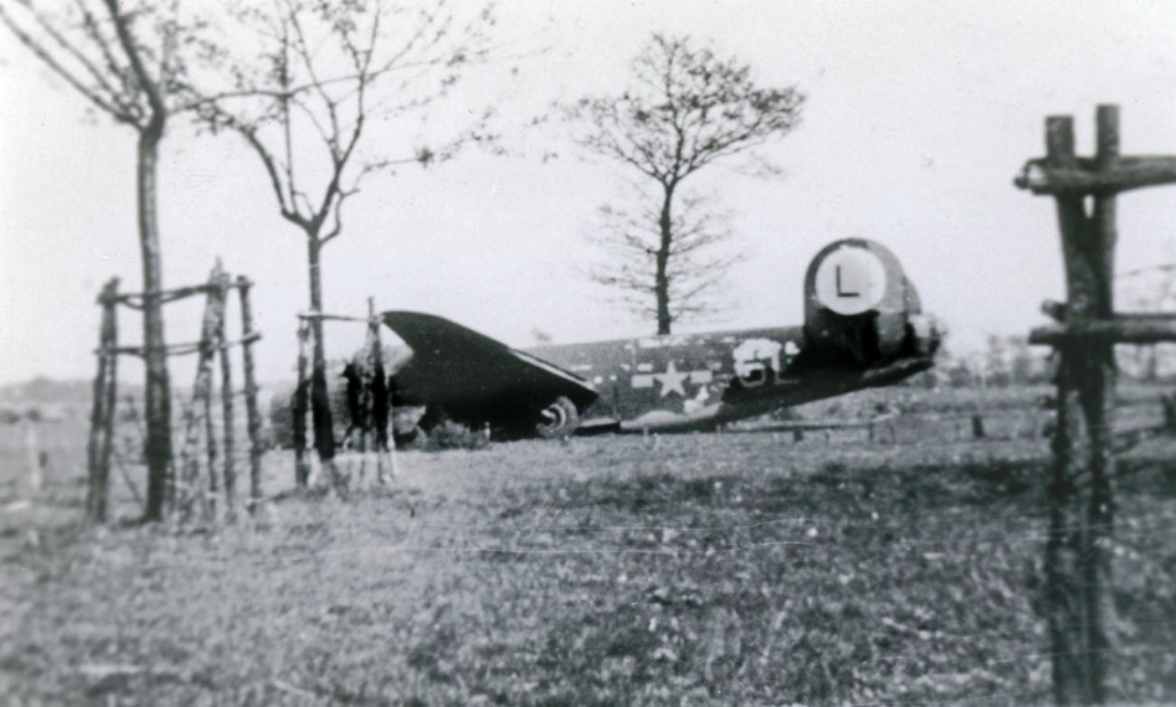
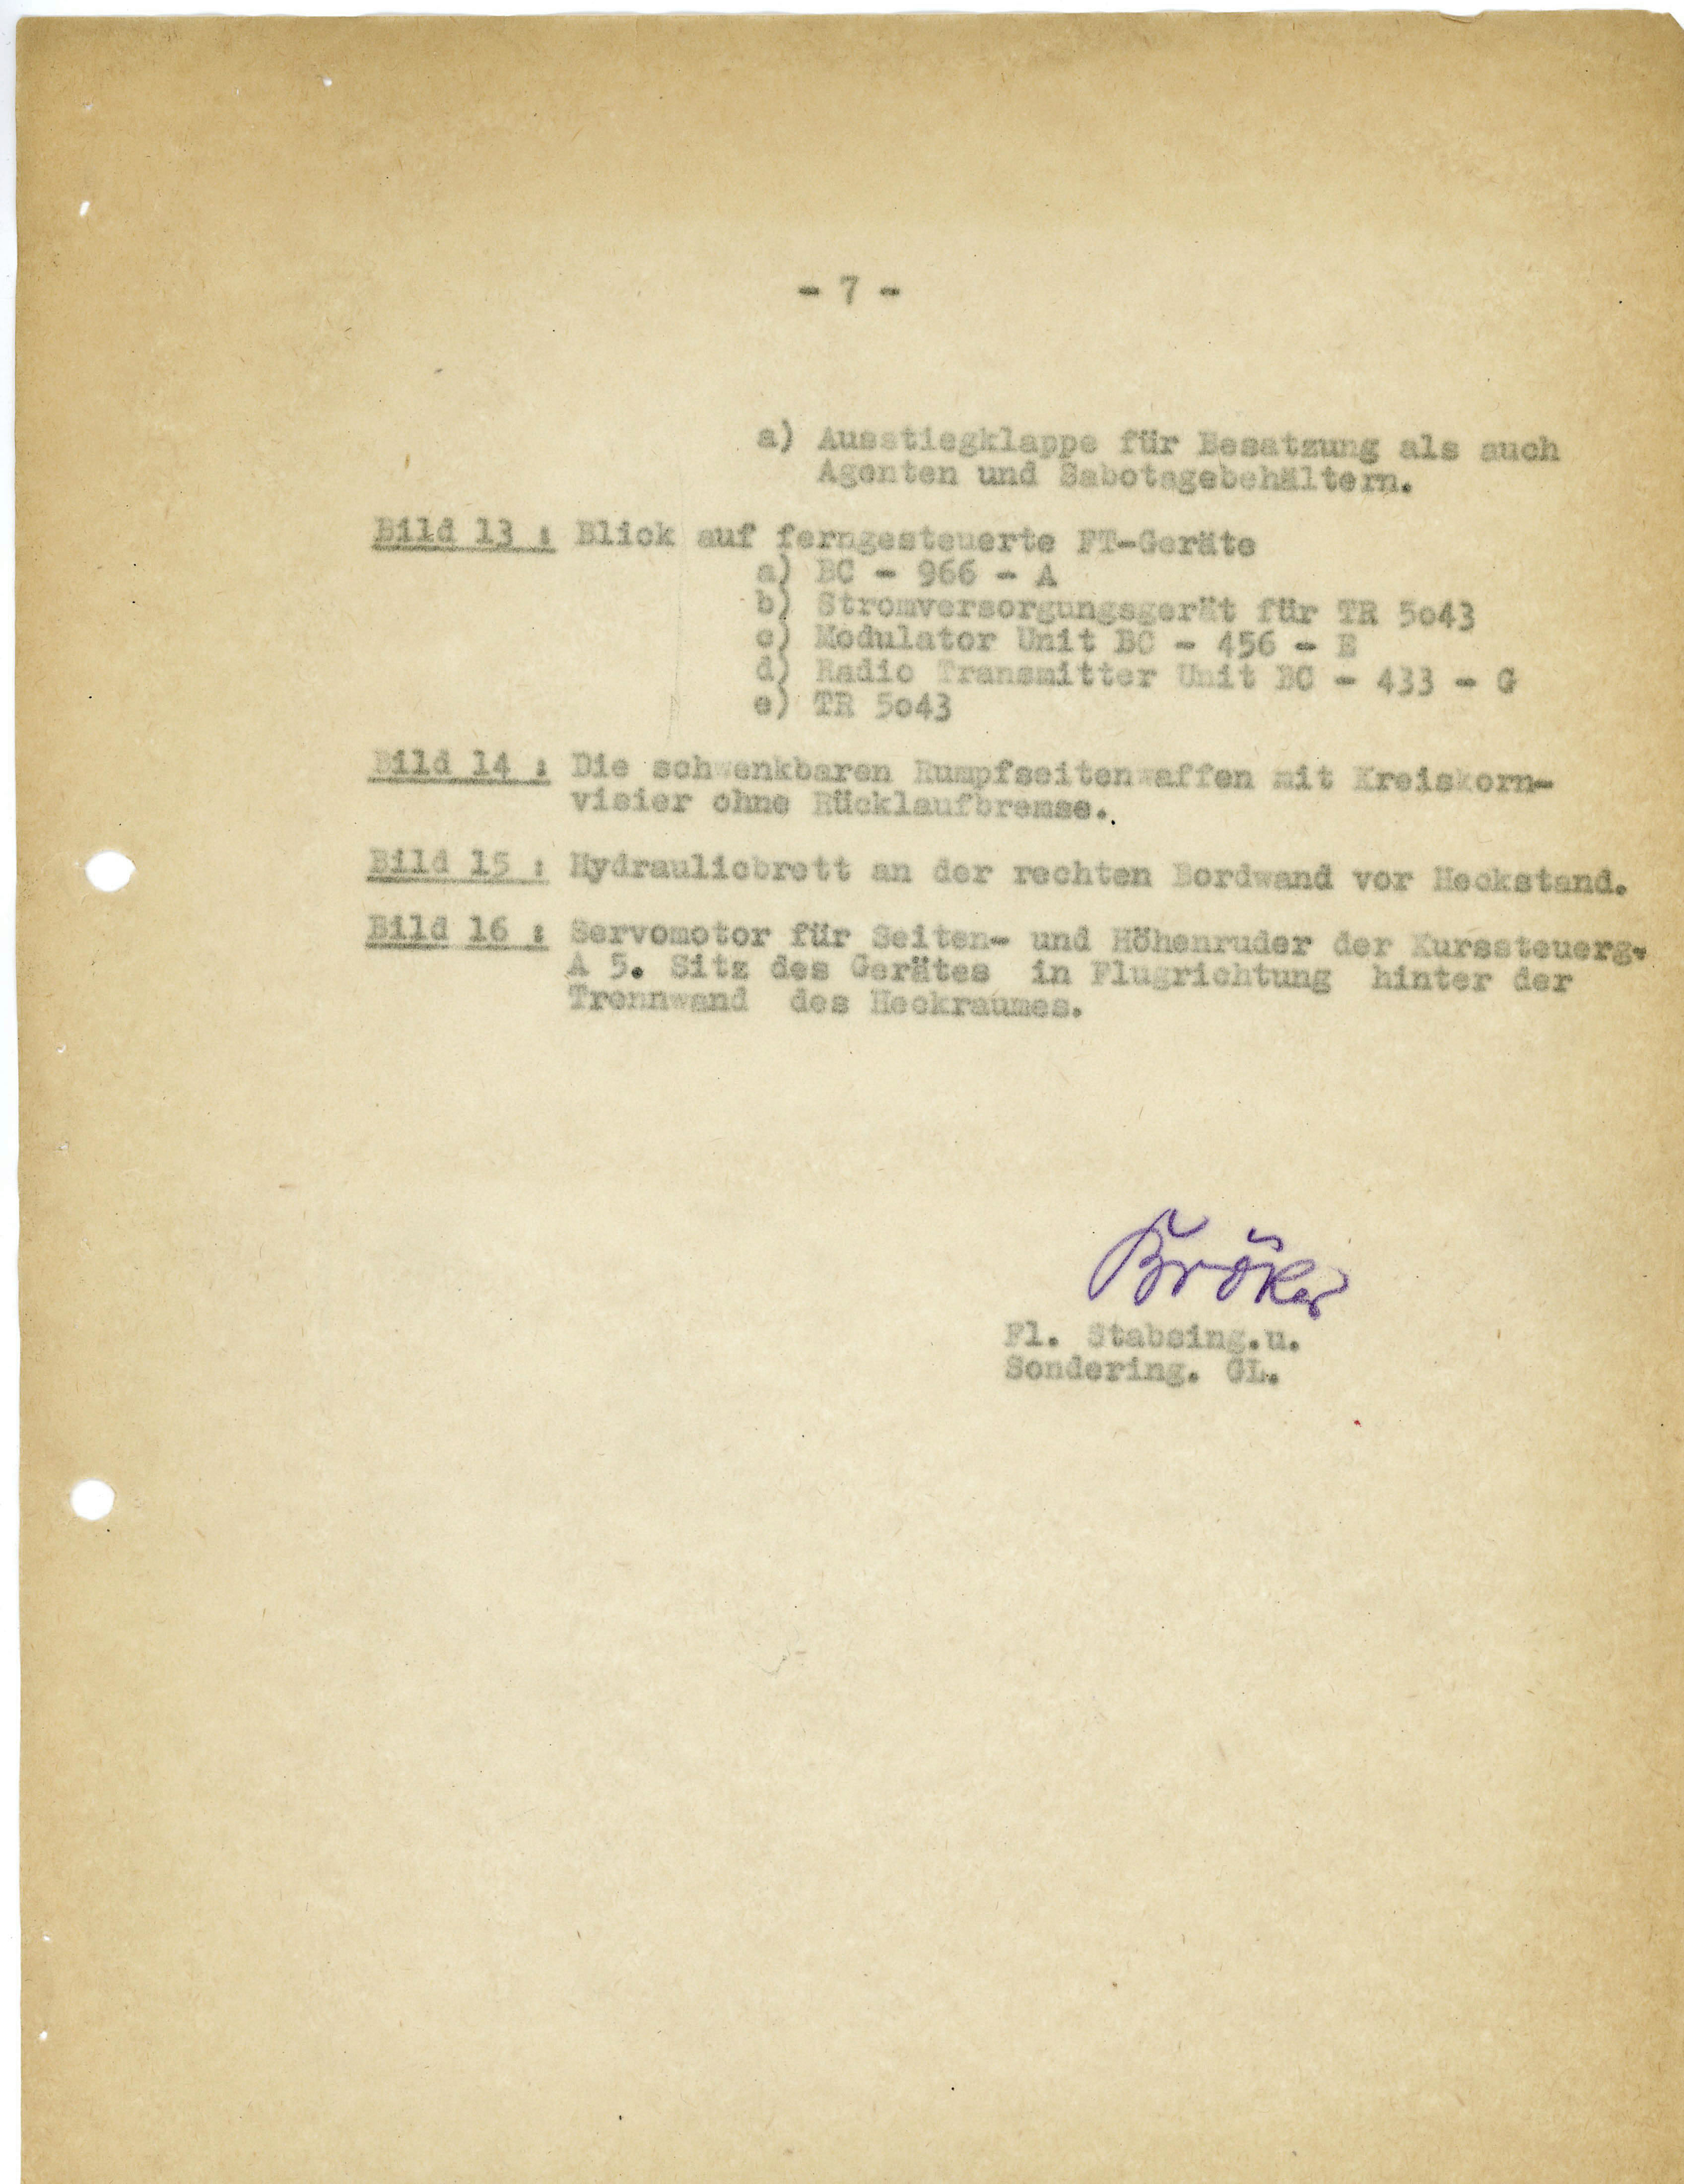 Bild 1 Ansicht der Maschine von Vorn.
Picture 1 View of the machine from the front.
Bild 2 Ansicht der Maschine von hinten. Man beachte das weggeknickte Fahrwerk.
Picture 2 View of the machine from behind. Note the bent landing gear.
Bild 3 Rumpfende mit Leiwerk und Staffelkenner.
Picture 3 Fuselage tail with body work and [squadron signal light].
Bild 4 Rumpfvorderteil:
a) Staurohr
b) Blister für Navigator beidseitig
c) Abtriftmesser
d) mit den Bewegungen der Waffen gekoppelte Panzerblickscheibe
e) Panzerplatten aussenbords, links und rechts
Picture 4 Fuselage front:
a) Pitot tube
b) Blisters for navigator on both sides
c) Drift [meter?]
d) Armored sighting window, coupled with the movement of the weapons
e) External armor plate, left and right
Bild 5 Linker Flügel mit Triebwerken.
Picture 5 Left wing with engines.
Bild 6 Blick über Waffenstand Rumpfoberseite, Antennenanordnung nach dem Leitwerk:
a) Rückspiegel für Schützen auf Rumpfoberseite
b) Revi N 6 A
Picture 6 View of the weapon stand [dorsal turret] top of the fuselage, antenna arrangement according to the control unit:
a) Rear-view mirror for gunner on fuselage top
b) Revi N 6A
Bild 7 Blick auf Führerstand:
a), b), c), d), Panzerglasscheiben
e) Panzerplatte
Picture 7 View of pilot’s seat:
a), b), c), d), armored glass panes
e) Armor plate
Bild 8 Ausgefahrener Notsporn
Picture 8 Extended emergency skid
Bild 9 Bugturm mit Panzerglasscheibe und Antrieb.
Picture 9 Nose spire [sic] with armored glass pane and drive.
Bild 10 Plexiglasverkleidung des Bugturmes mit aufgemalter
a) Sprung des Plexiglasses wurde durch beidseitige Lochung der Plexiglashälften und durch Einziehen eines Drahtes zickzackförmig verbunden.
Picture 10 Plexiglass covering of the nose spire [sic] with painted [markings]
a) Crack of the plexiglass was zigzagged by bilateral perforation of the plexiglass halves and by pulling in a wire.
Bild 11 Blick in rückwärtigen Kabinenabschnitt mit MK-Kugel und Rumpfseitenständen.
Picture 11 View in the rear cabin section with machine-gun bullets and trunk sides.
Bild 12 Unterbringung der Munitionskästen für Heckstand an der rechten Bordwand hinter dem rechten Fenster. Darüber Seenotsender mit Zubehöirbehälter.
a) Ausstiegklappe für Besatzung als auch Agenten und Sabotagebehältern.
Picture 12 Accommodation of the ammunition boxes for the rear deck on the right side of the vehicle
behind the right window. Above that, distress transmitter with accessory container.
a) The exit flap for crew as well as agents and sabotage containers.
Bild 13 Blick auf ferngesteuerte FT-Geräte
a) BC – 966 – A
b) Stromversorgungsgerät für TR 5043
c) Modulator Unit BC – 456 – E
d) Radio Transmitter Unit BC – 433 – G
e) TR 5043
Picture 13 View of remote controlled FT devices
a) BC – 966 – A
b) Power device for TR 5043
c) Modulator unit BC – 456 – E
d) Radio transmitter unit BC – 433 – G
e) TR 5043
Bild 14 Die schwenkbaren Rumpfseitenwaffen mit Kreiskornvisier ohne Rücklaufbremse.
Picture 14 The swivel[ing] fuselage side weapons with a circular horn sight without a return brake.
Bild 15 Hydraulicbrett an der rechten Bordwand vor Heckstand.
Picture 15 Hydraulic board on the right side of the vehicle in front of the tail.
Bild 16 Servomotor für Seiten- und Höhenruder der Kurssteurerg A 5. Sitz des Gerätes in Flugrichtung hinter der Trennwand des Heckraumes.
Picture 16 Servomotor for side and height control of the steering wheel A 5. Seat of the device in the direction of flight behind the partition of the rear compartment.
______________________________
THE PHOTOGRAPHS
 Bild 1 Ansicht der Maschine von Vorn.
Picture 1 View of the machine from the front.
Comments: Note that none of the props appear to have been feathered, and the lower blades of two starboard props appear to be bent. The landing gear has been lowered.
______________________________
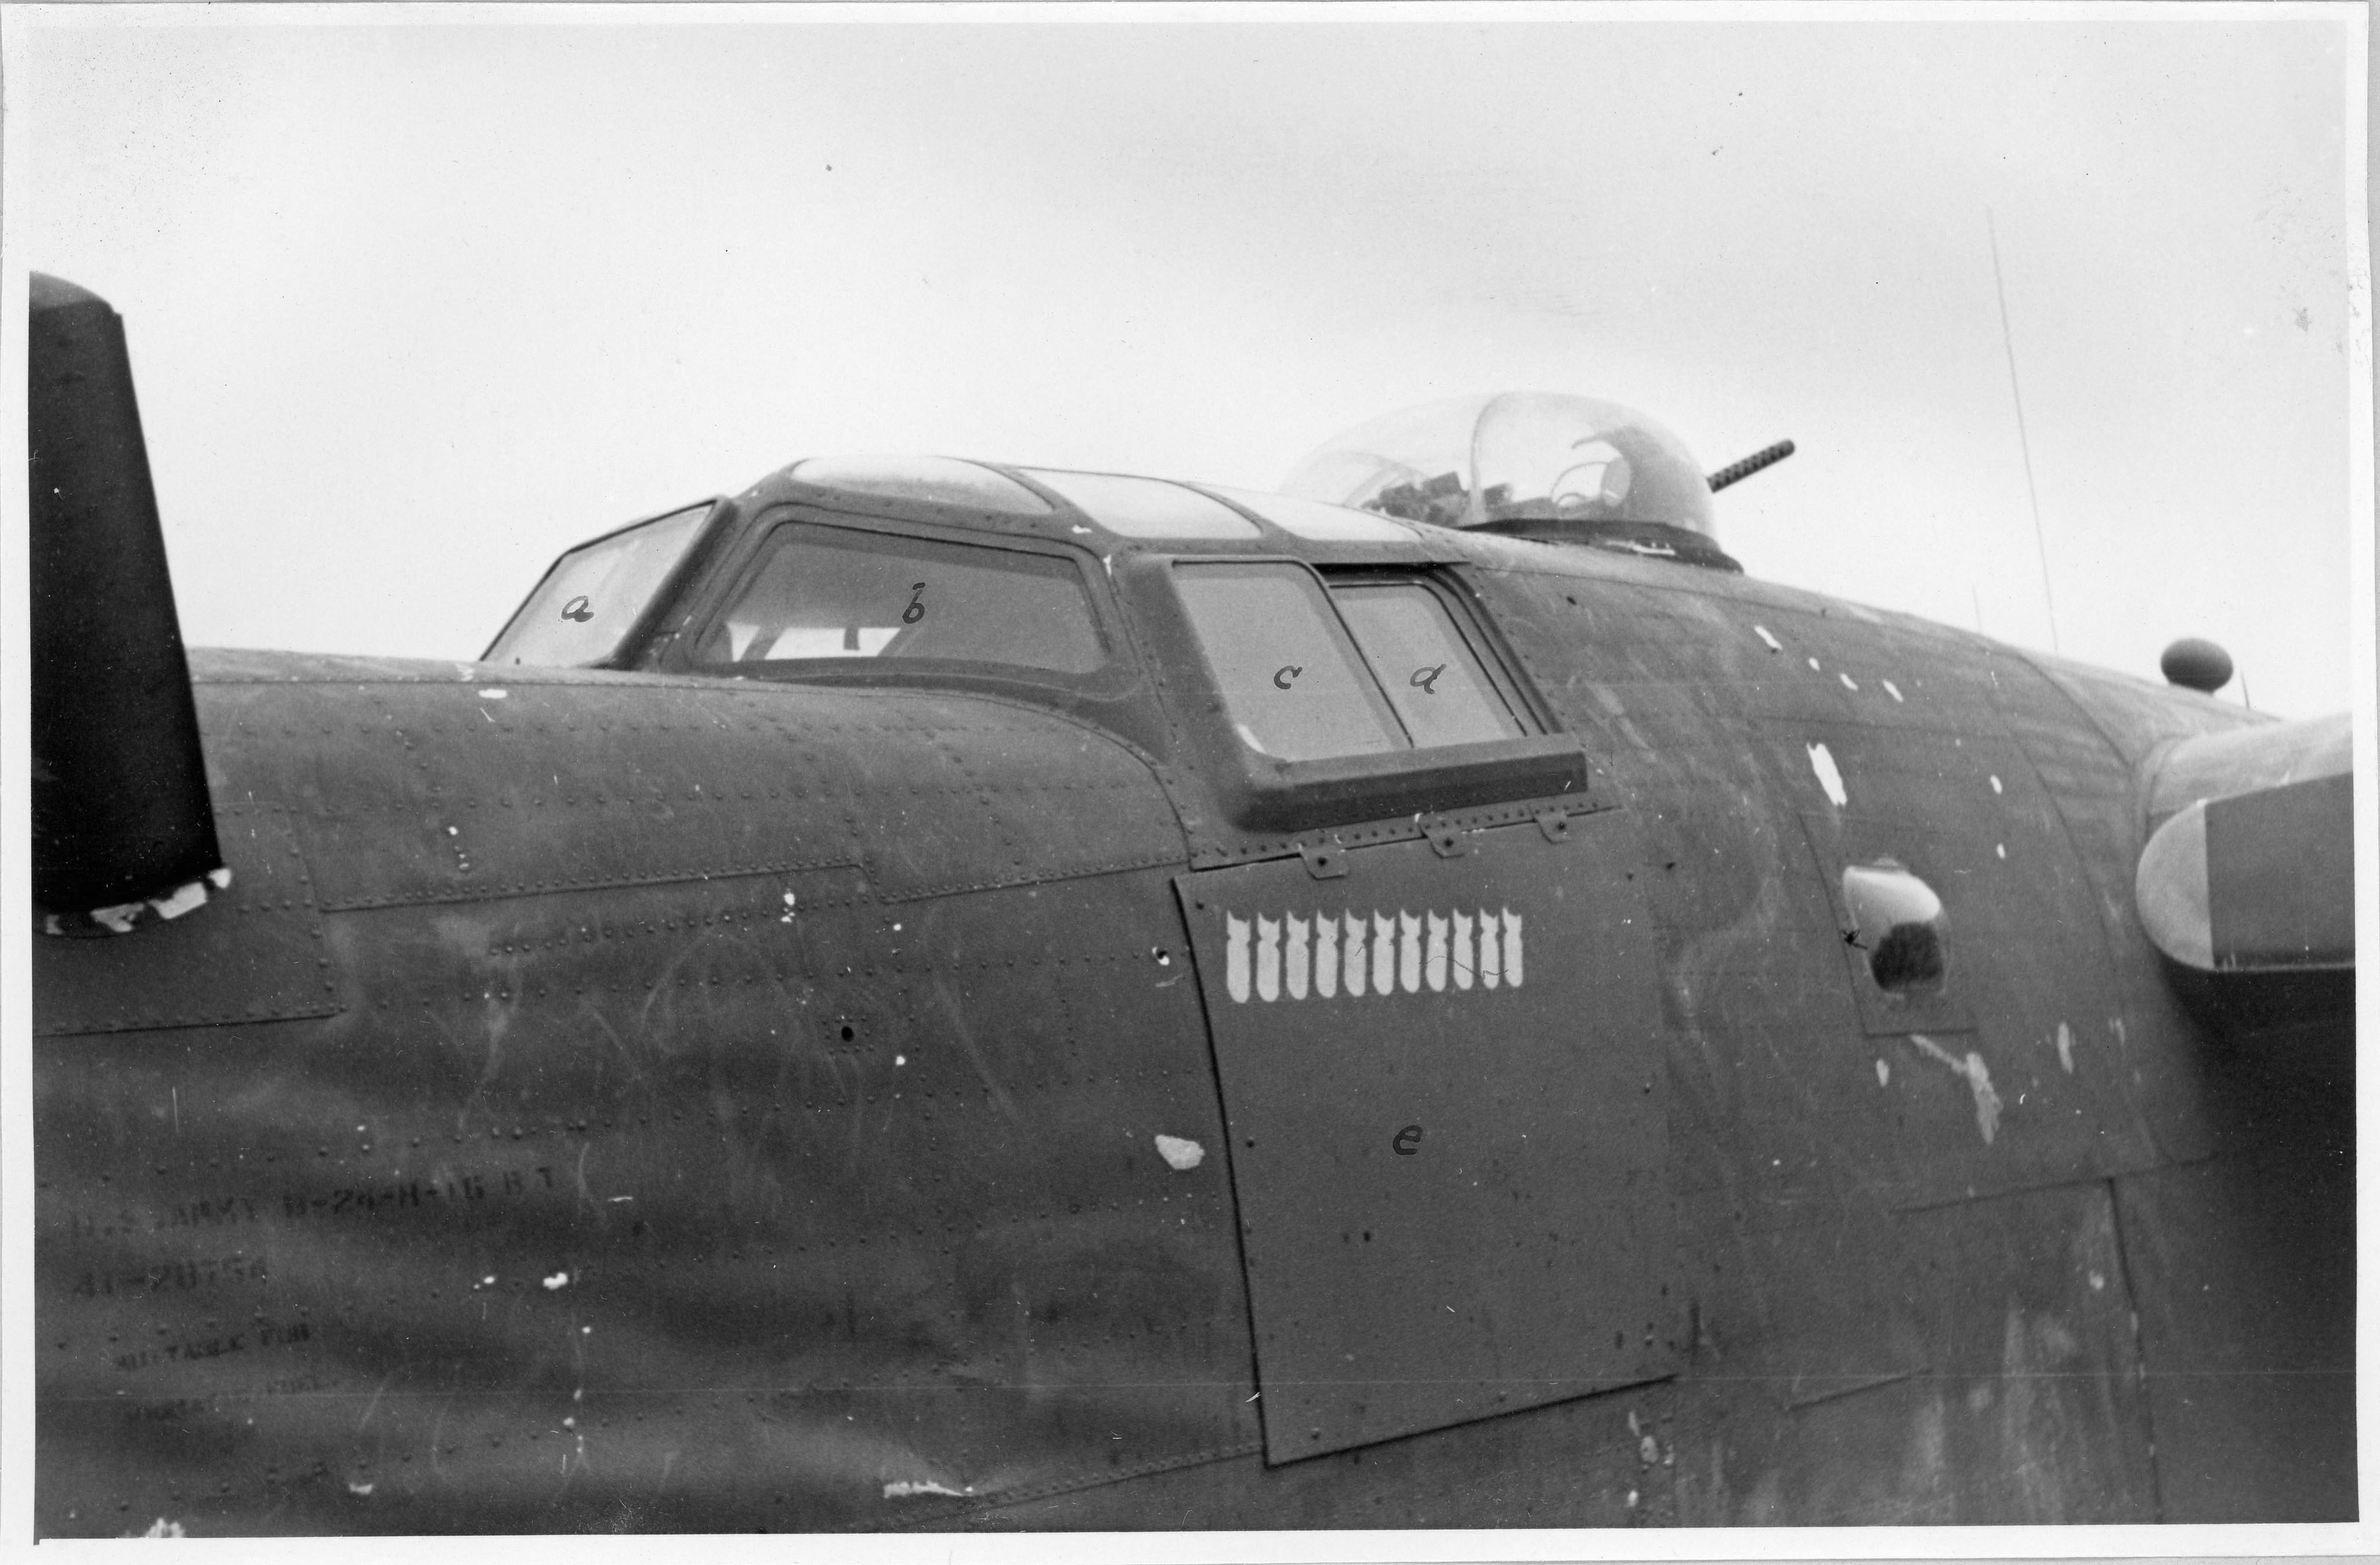 Bild 7 Blick auf Führerstand:
a), b), c), d), Panzerglasscheiben
e) Panzerplatte
Picture 7 View of pilot’s seat:
a), b), c), d), armored glass panes
e) Armor plate
Comments: The skin of the forward fuselage is crumpled. Armored glass and pilot’s compartment exterior side armor – of obvious of interest to the photographer – are clearly visible.
______________________________
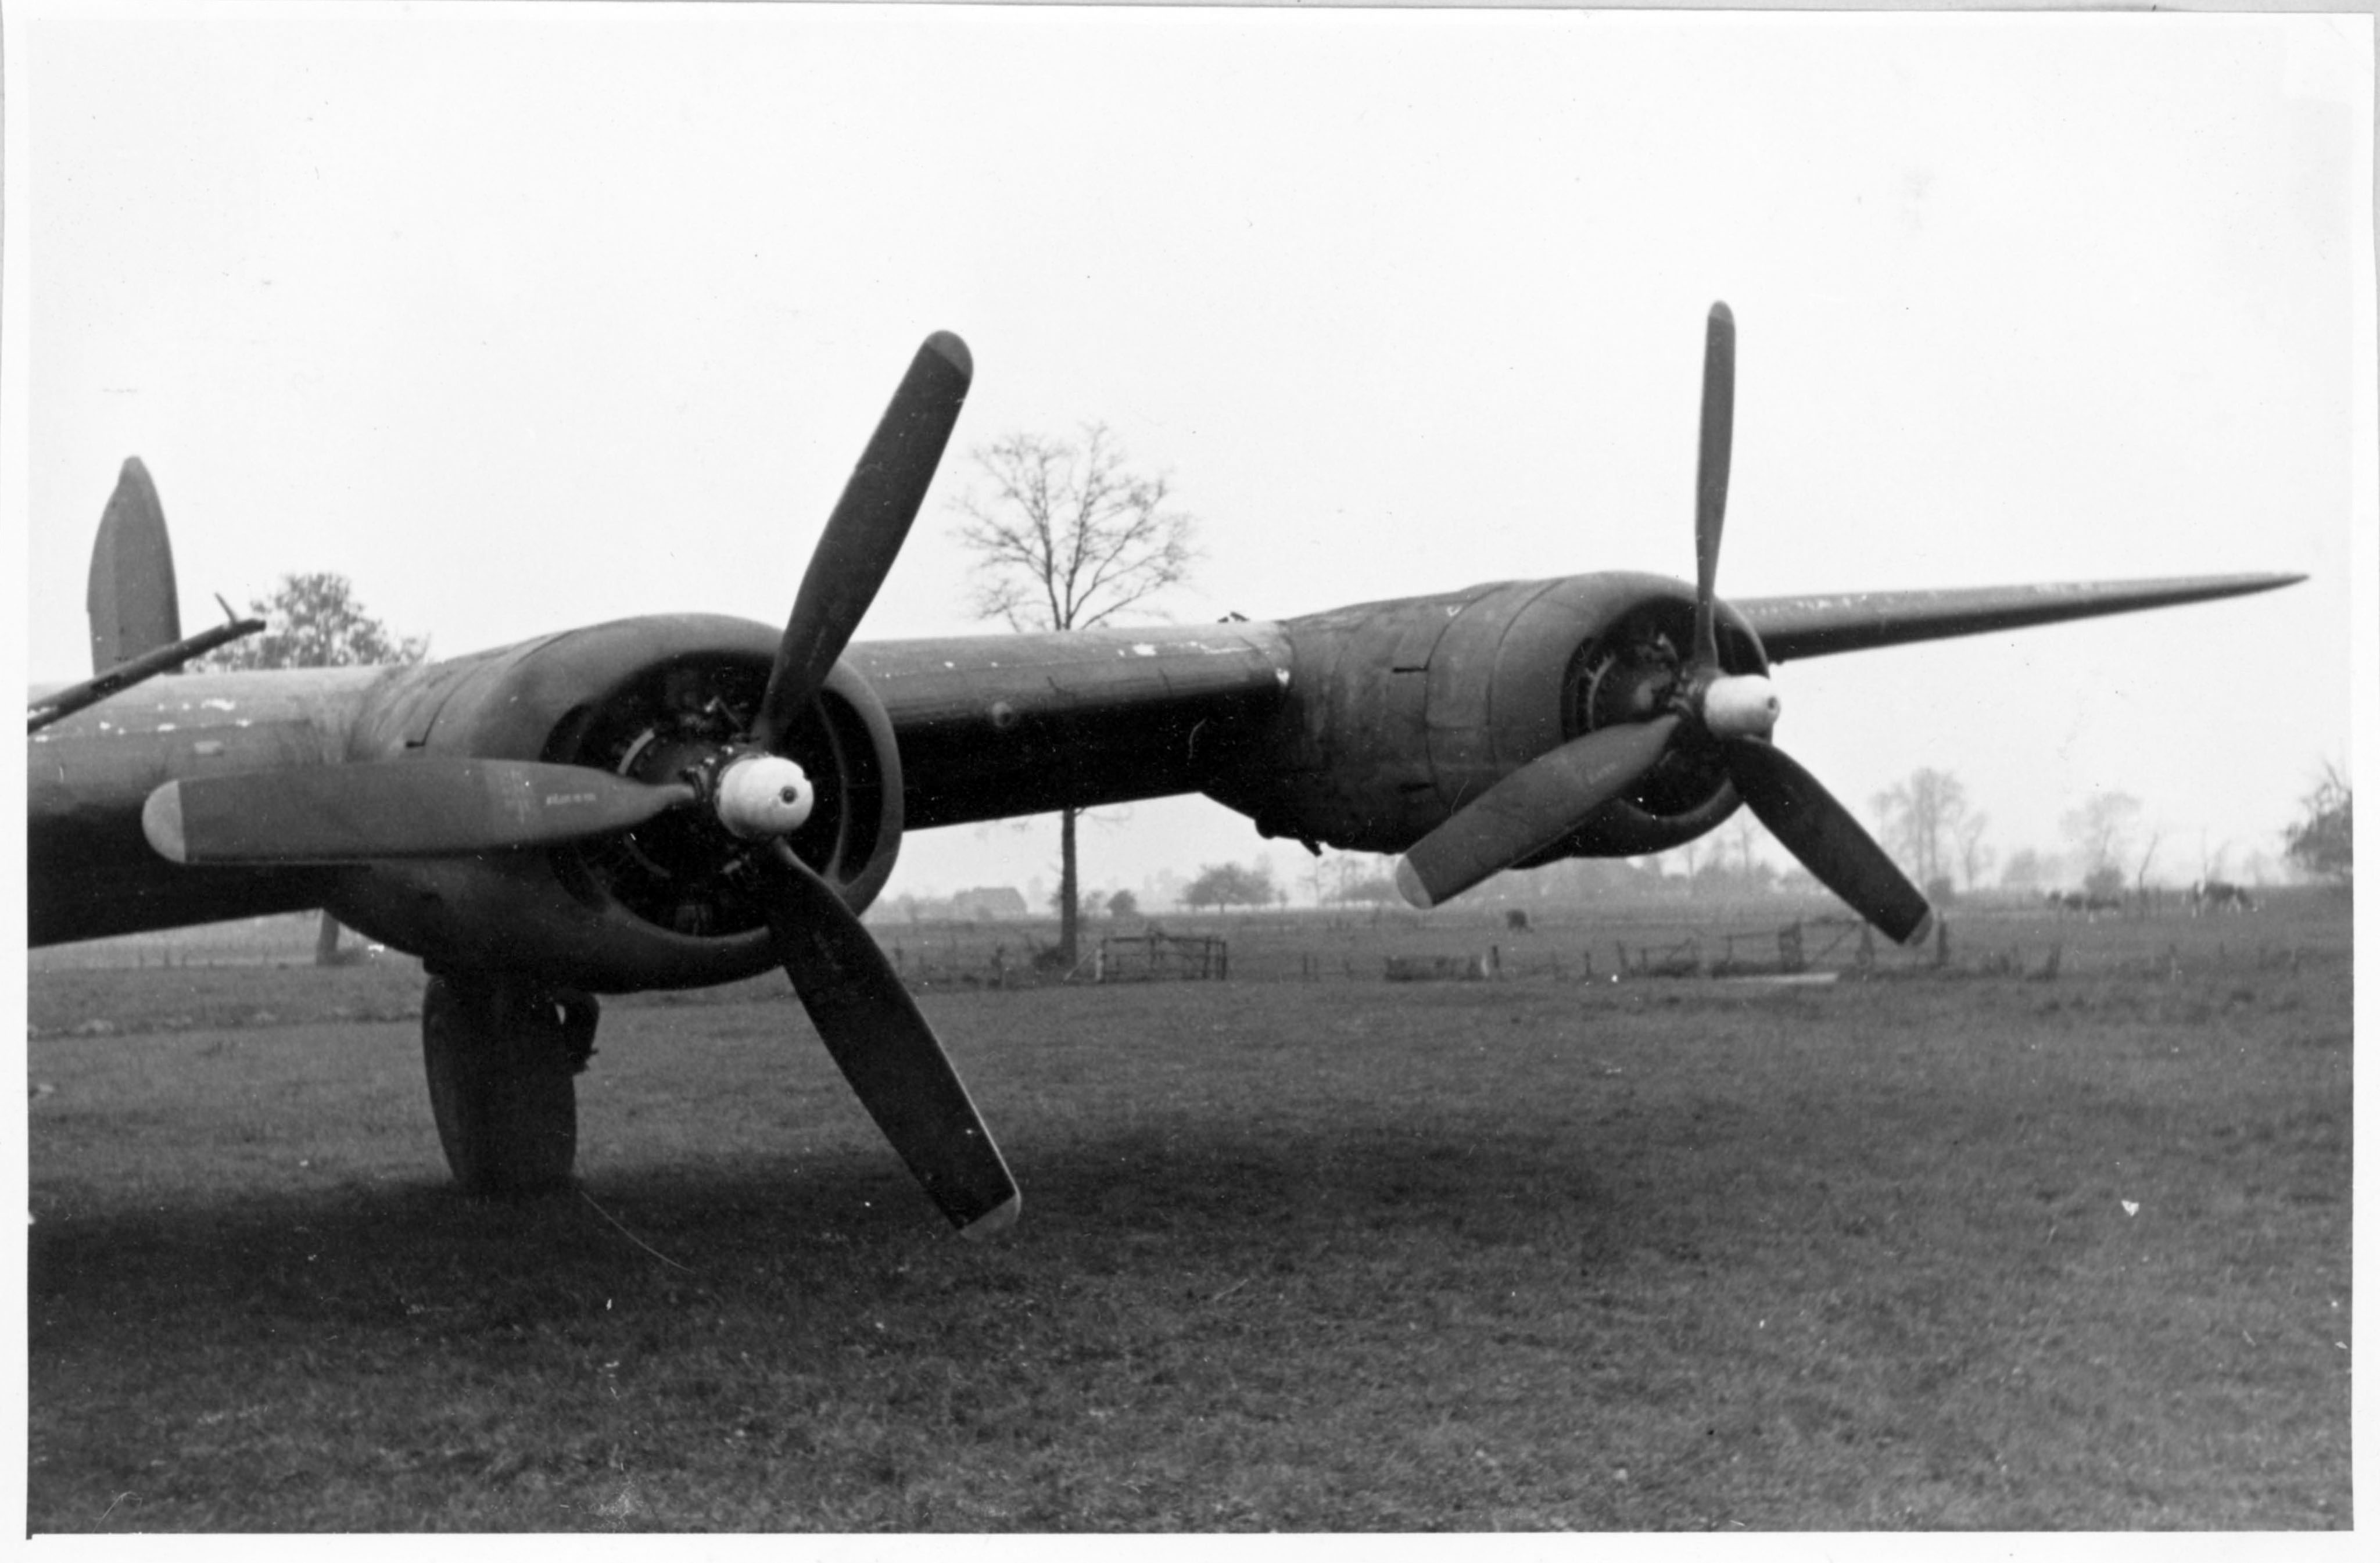 Bild 5 Linker Flügel mit Triebwerken.
Picture 5 Left wing with engines.
______________________________
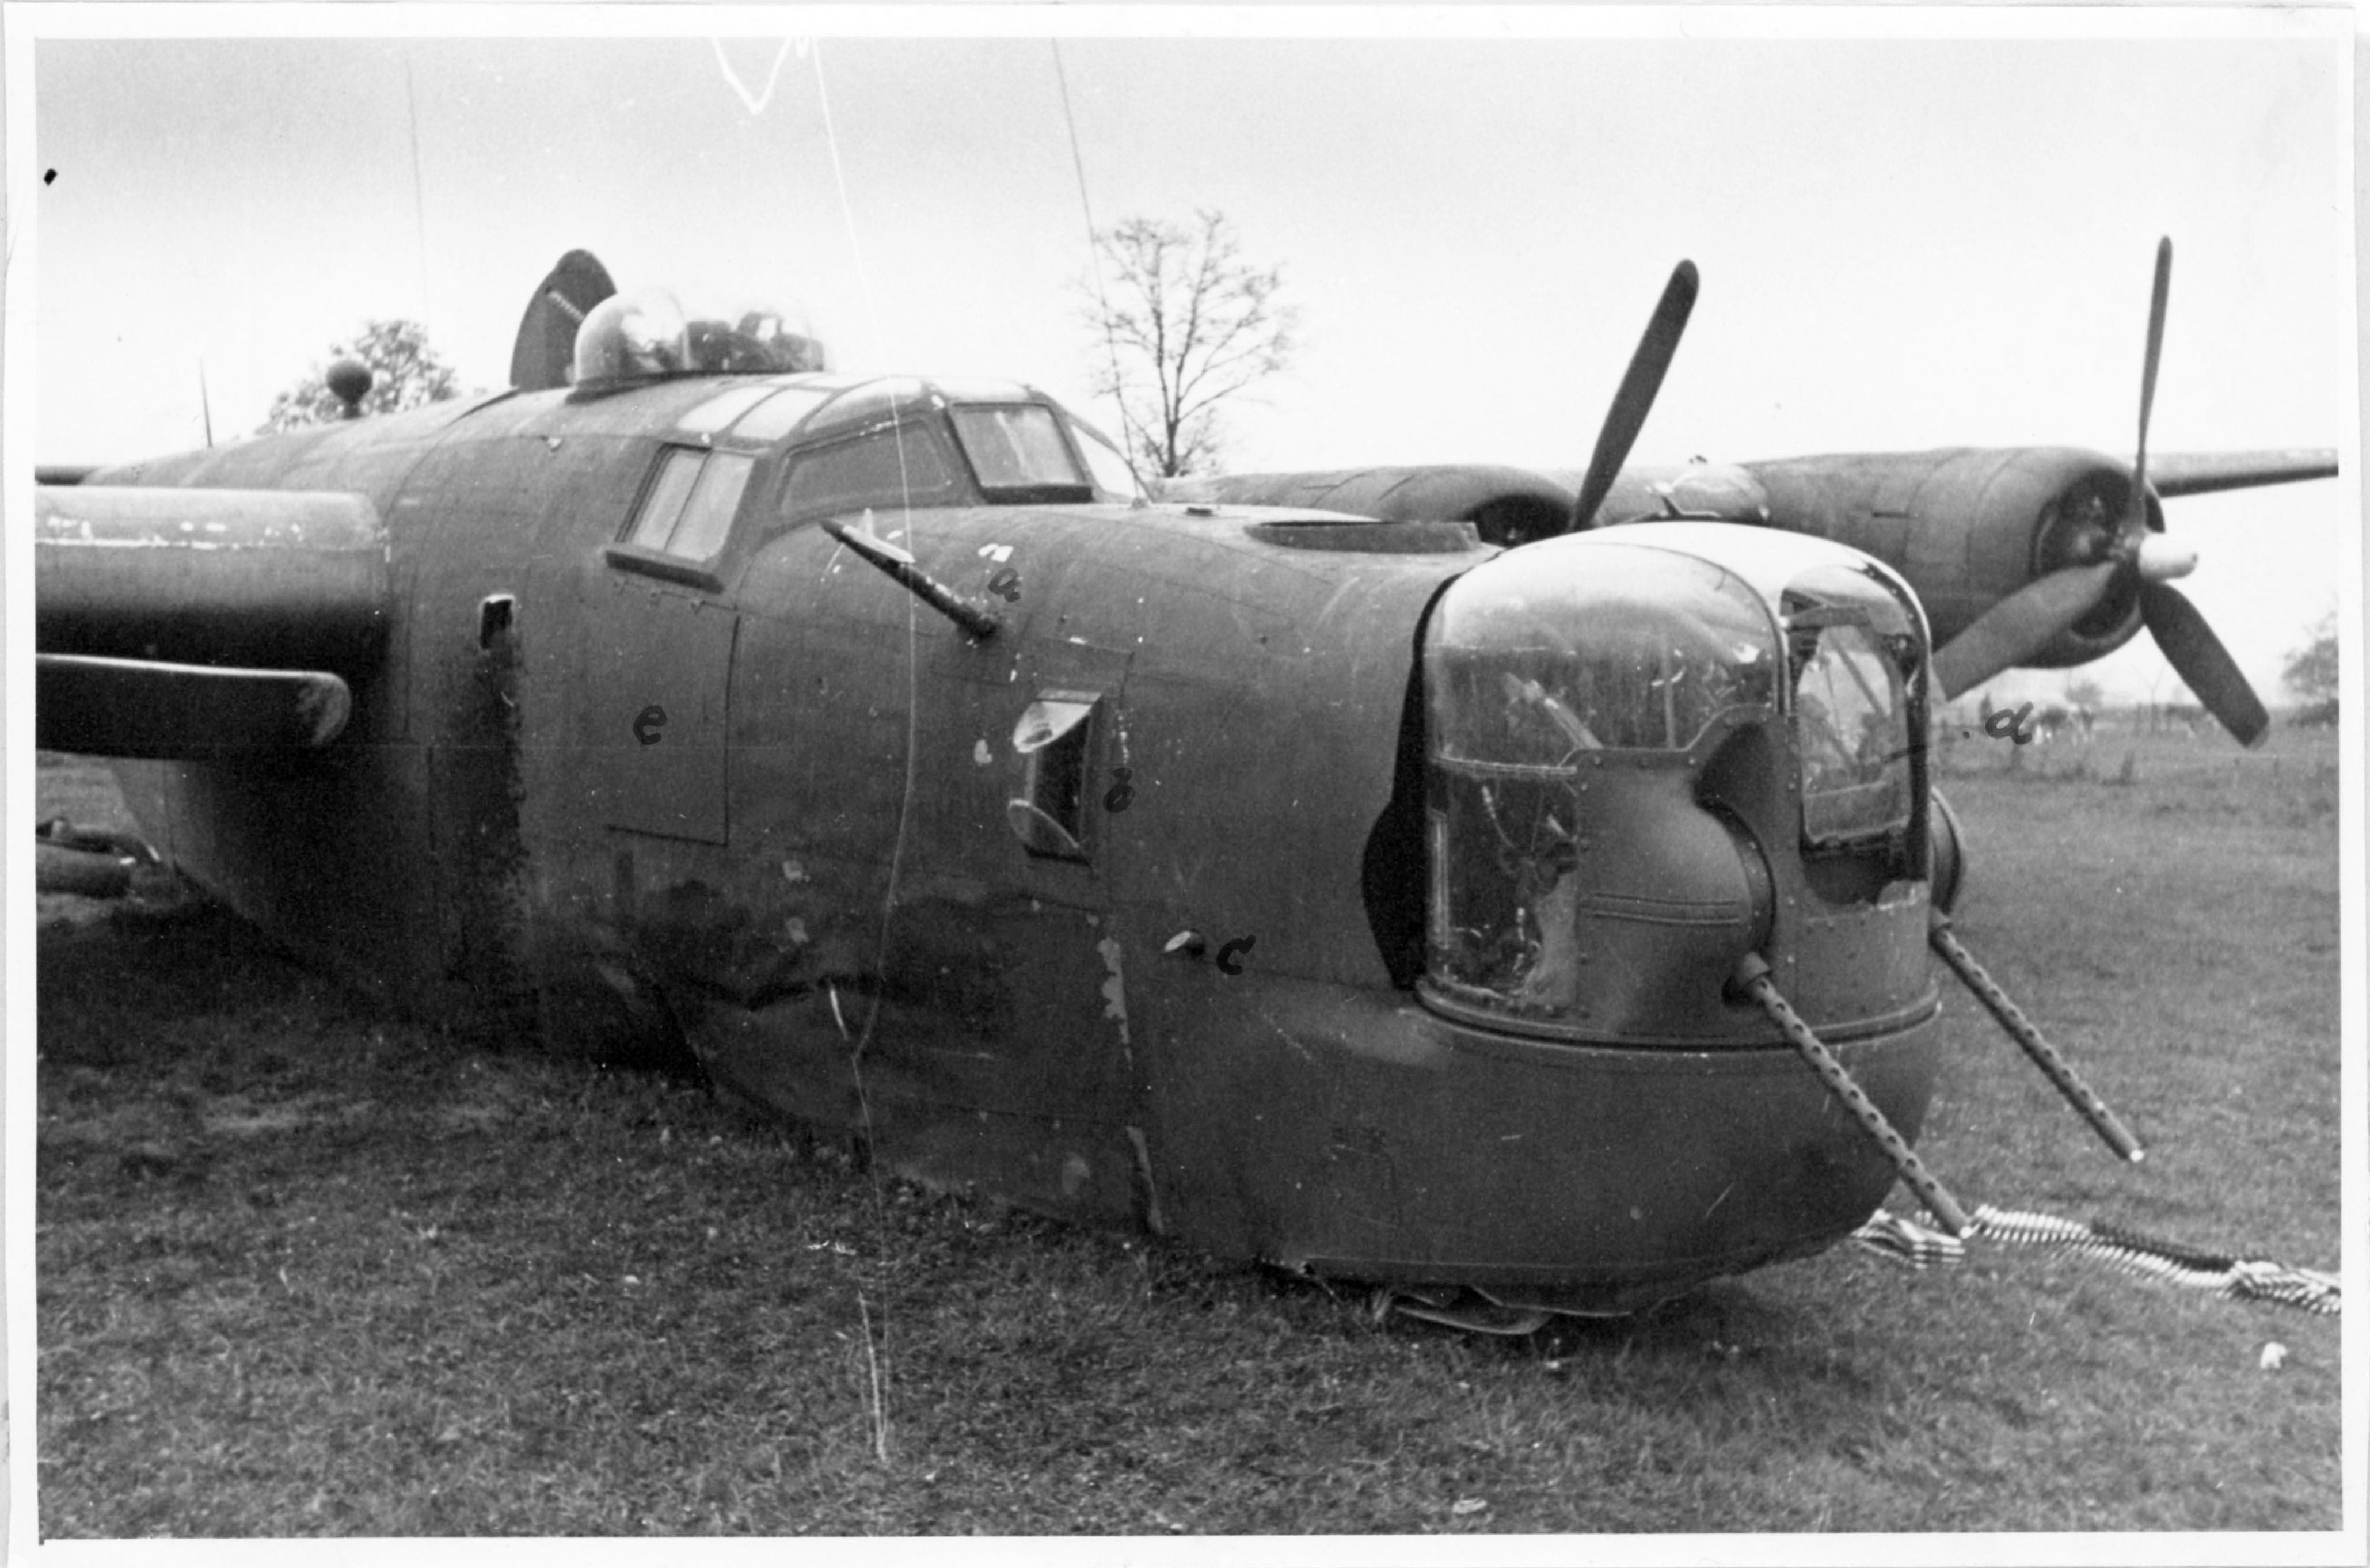 Bild 4 Rumpfvorderteil:
a) Staurohr
b) Blister für Navigator beidseitig
c) Abtriftmesser
d) mit den Bewegungen der Waffen gekoppelte Panzerblickscheibe
e) Panzerplatten aussenbords, links und rechts
Picture 4 Fuselage front:
a) Pitot tube
b) Blisters for navigator on both sides
c) Drift [meter?]
d) Armored sighting window, coupled with the movement of the weapons
e) External armor plate, left and right
Comments: Note the attention to co-pilot’s exterior side armor, and crumpled skin of the front fuselage.
______________________________
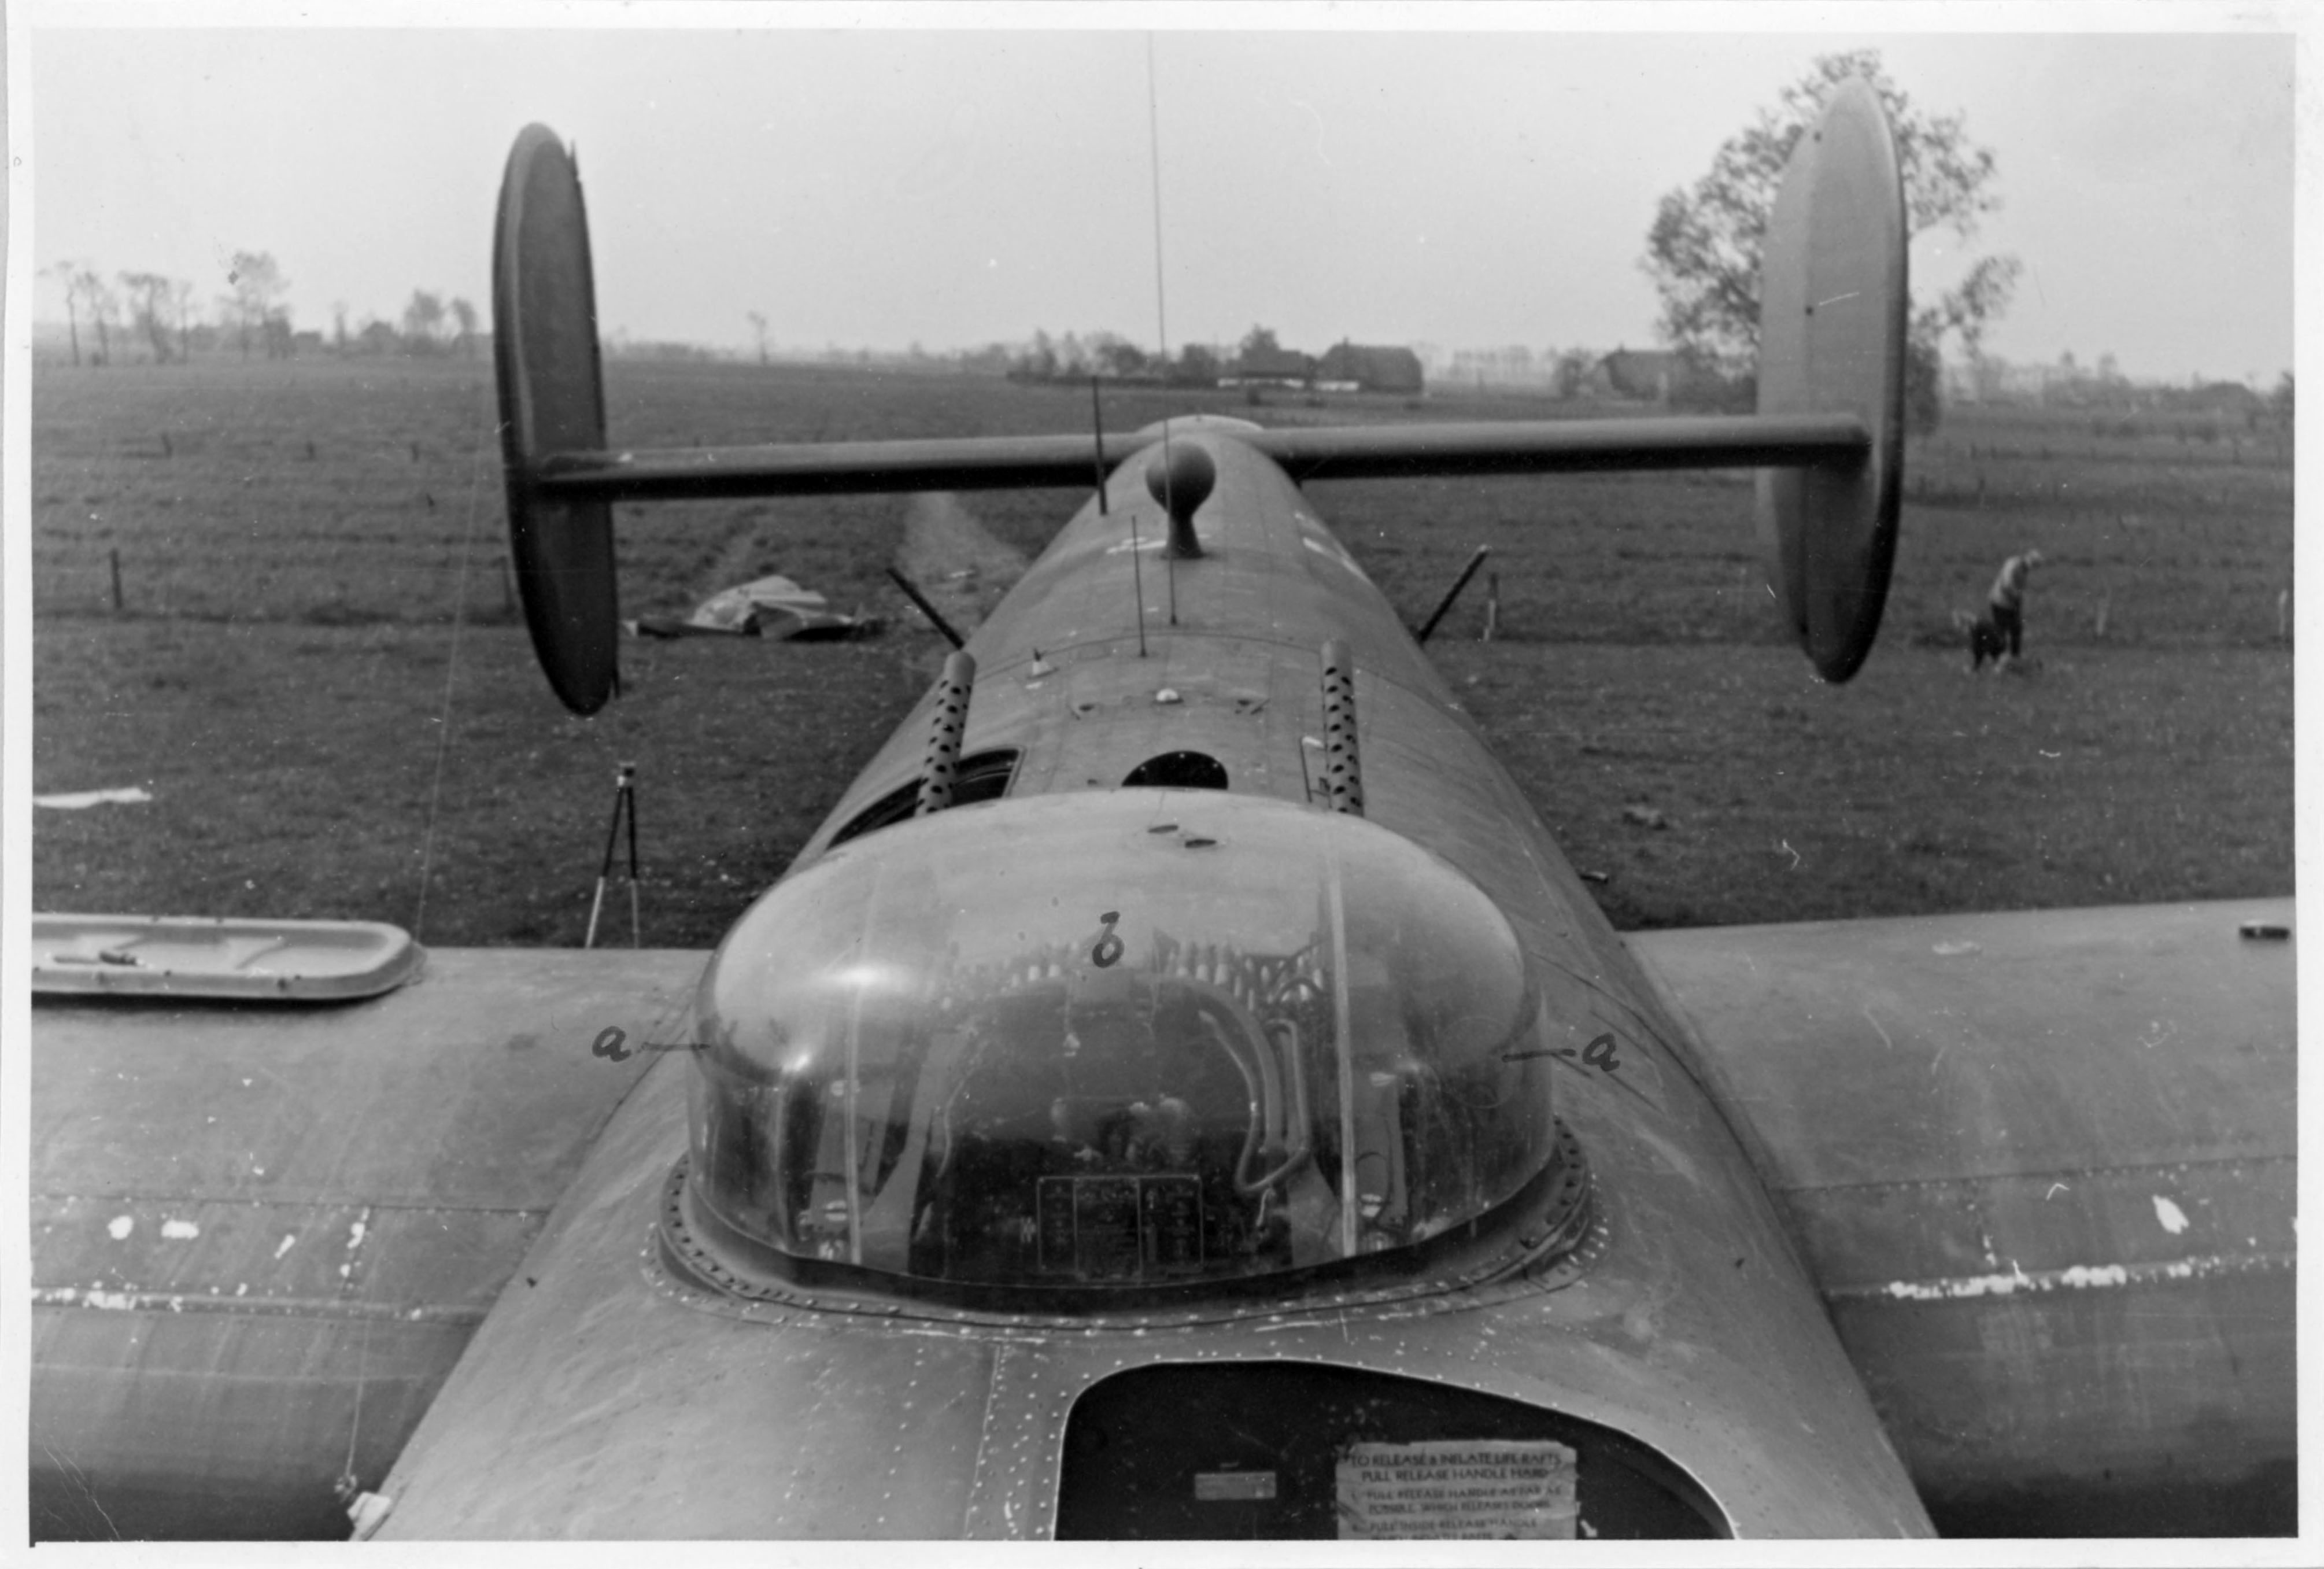
Bild 6 Blick über Waffenstand Rumpfoberseite, Antennenanordnung nach dem Leitwerk:
a) Rückspiegel für Schützen auf Rumpfoberseite
b) Revi N 6 A
Picture 6 View of the weapon stand [dorsal turret] top of the fuselage, antenna arrangement according to the control unit:
a) Rear-view mirror for gunner on fuselage top
b) Revi N 6A
Comments: An excellent view of the top of the rear fuselage. Note the furrows created by the impact of the starboard landing gear tire and fuselage bottom. These extend only a very short distance behind the aircraft into the adjoining field, implying a very abrupt stop.
The dorsal turret is probably the Martin A-3C version as opposed to A-3D, the latter of which commenced with Block H-25 Liberators. Ironically, the German technical analyst referred to the turret gunsight as a “Revi N 6 A”. (Revi?!)
More intriguingly – at least, as described in the caption – are two circular rear-view mirrors mounted within opposite sides of the turret, each located between the .50 caliber machine gun and turret bubble. The starboard inner turret mirror is also visible in photograph number 7.
Notice that the cover of the starboard emergency life raft compartment has been detached from the fuselage.
______________________________
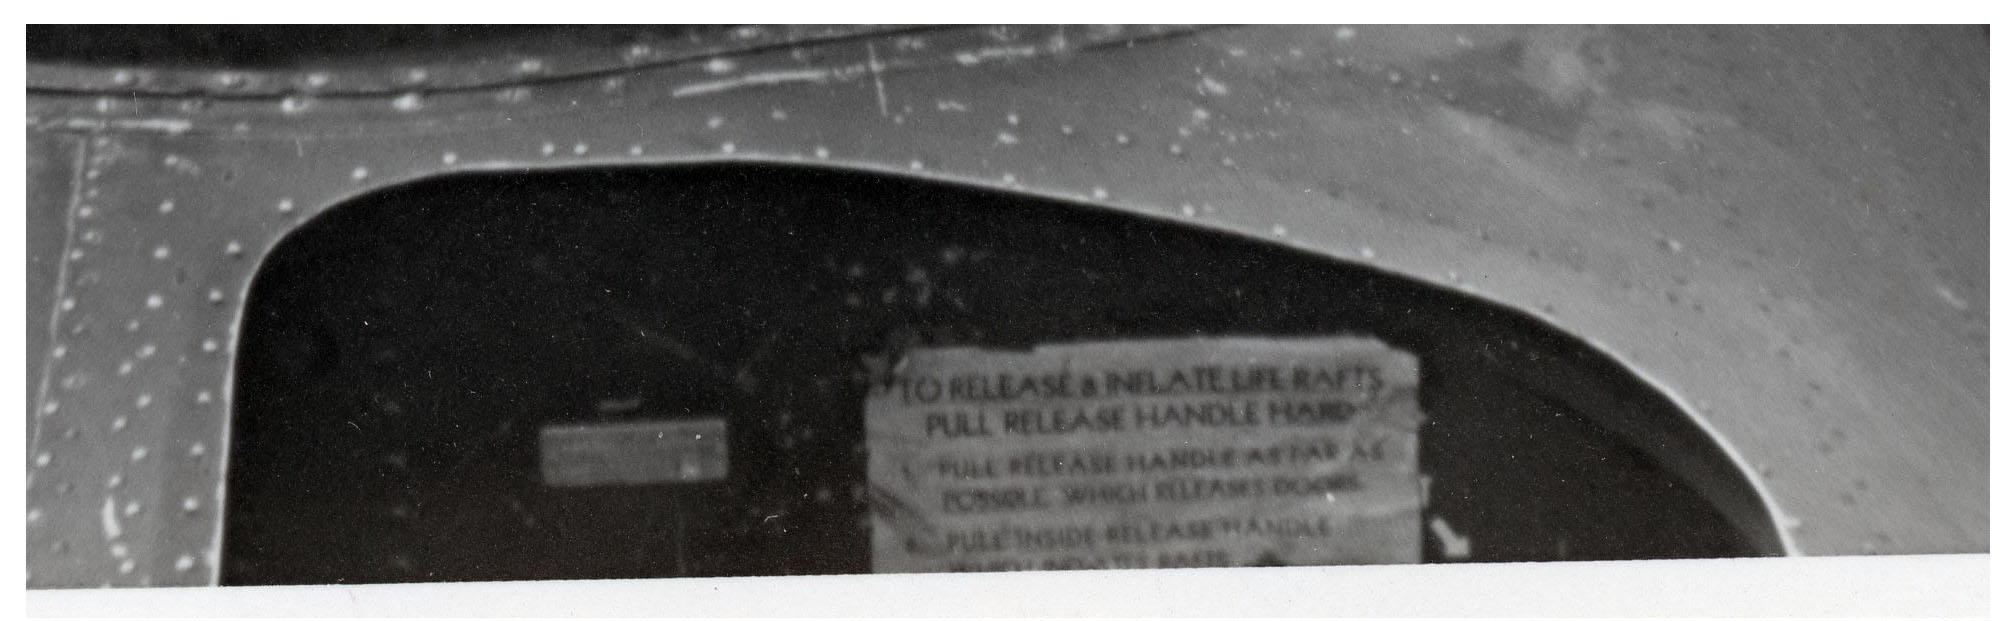 TO RELEASE & INFLATE LIFE RAFTS
PULL RELEASE HANDLE HARD
PULL RELEASE HANDLE AS FAR AS
POSSIBLE WHICH RELEASES DOORS
PULL INSIDE RELEASE HANDLE…
Comments: This is an 800 dpi scan from the previous photo, showing instructions concerning release of the B-24’s life-rafts.
______________________________
 Bild 10 Plexiglasverkleidung des Bugturmes mit aufgemalter
a) Sprung des Plexiglasses wurde durch beidseitige Lochung der Plexiglashälften und durch Einziehen eines Drahtes zickzackförmig verbunden.
Picture 10 Plexiglass covering of the nose spire [sic] with painted [markings]
a) Crack of the plexiglass was zigzagged by bilateral perforation of the plexiglass halves and by pulling in a wire.
Comments: Here’s a different way of looking at things: The photographer stood atop the front fuselage of Tell Me More, and pointing his camera down, photographed the top of the “dome” of the Emerson A-15 nose turret. Immediately apparent are numbers denoting the rotational azimuth of the turret – in gradations of 15 degrees relative to the fuselage center line – engraved or etched into the plexiglass. The overwhelming majority of photographs of the Emerson A-15 turret, where the turret is seen from the side, naturally don’t show this feature.
(Did the turret dome of the CAC / Motor Products tail turret have a similar azimuth scale?)
______________________________
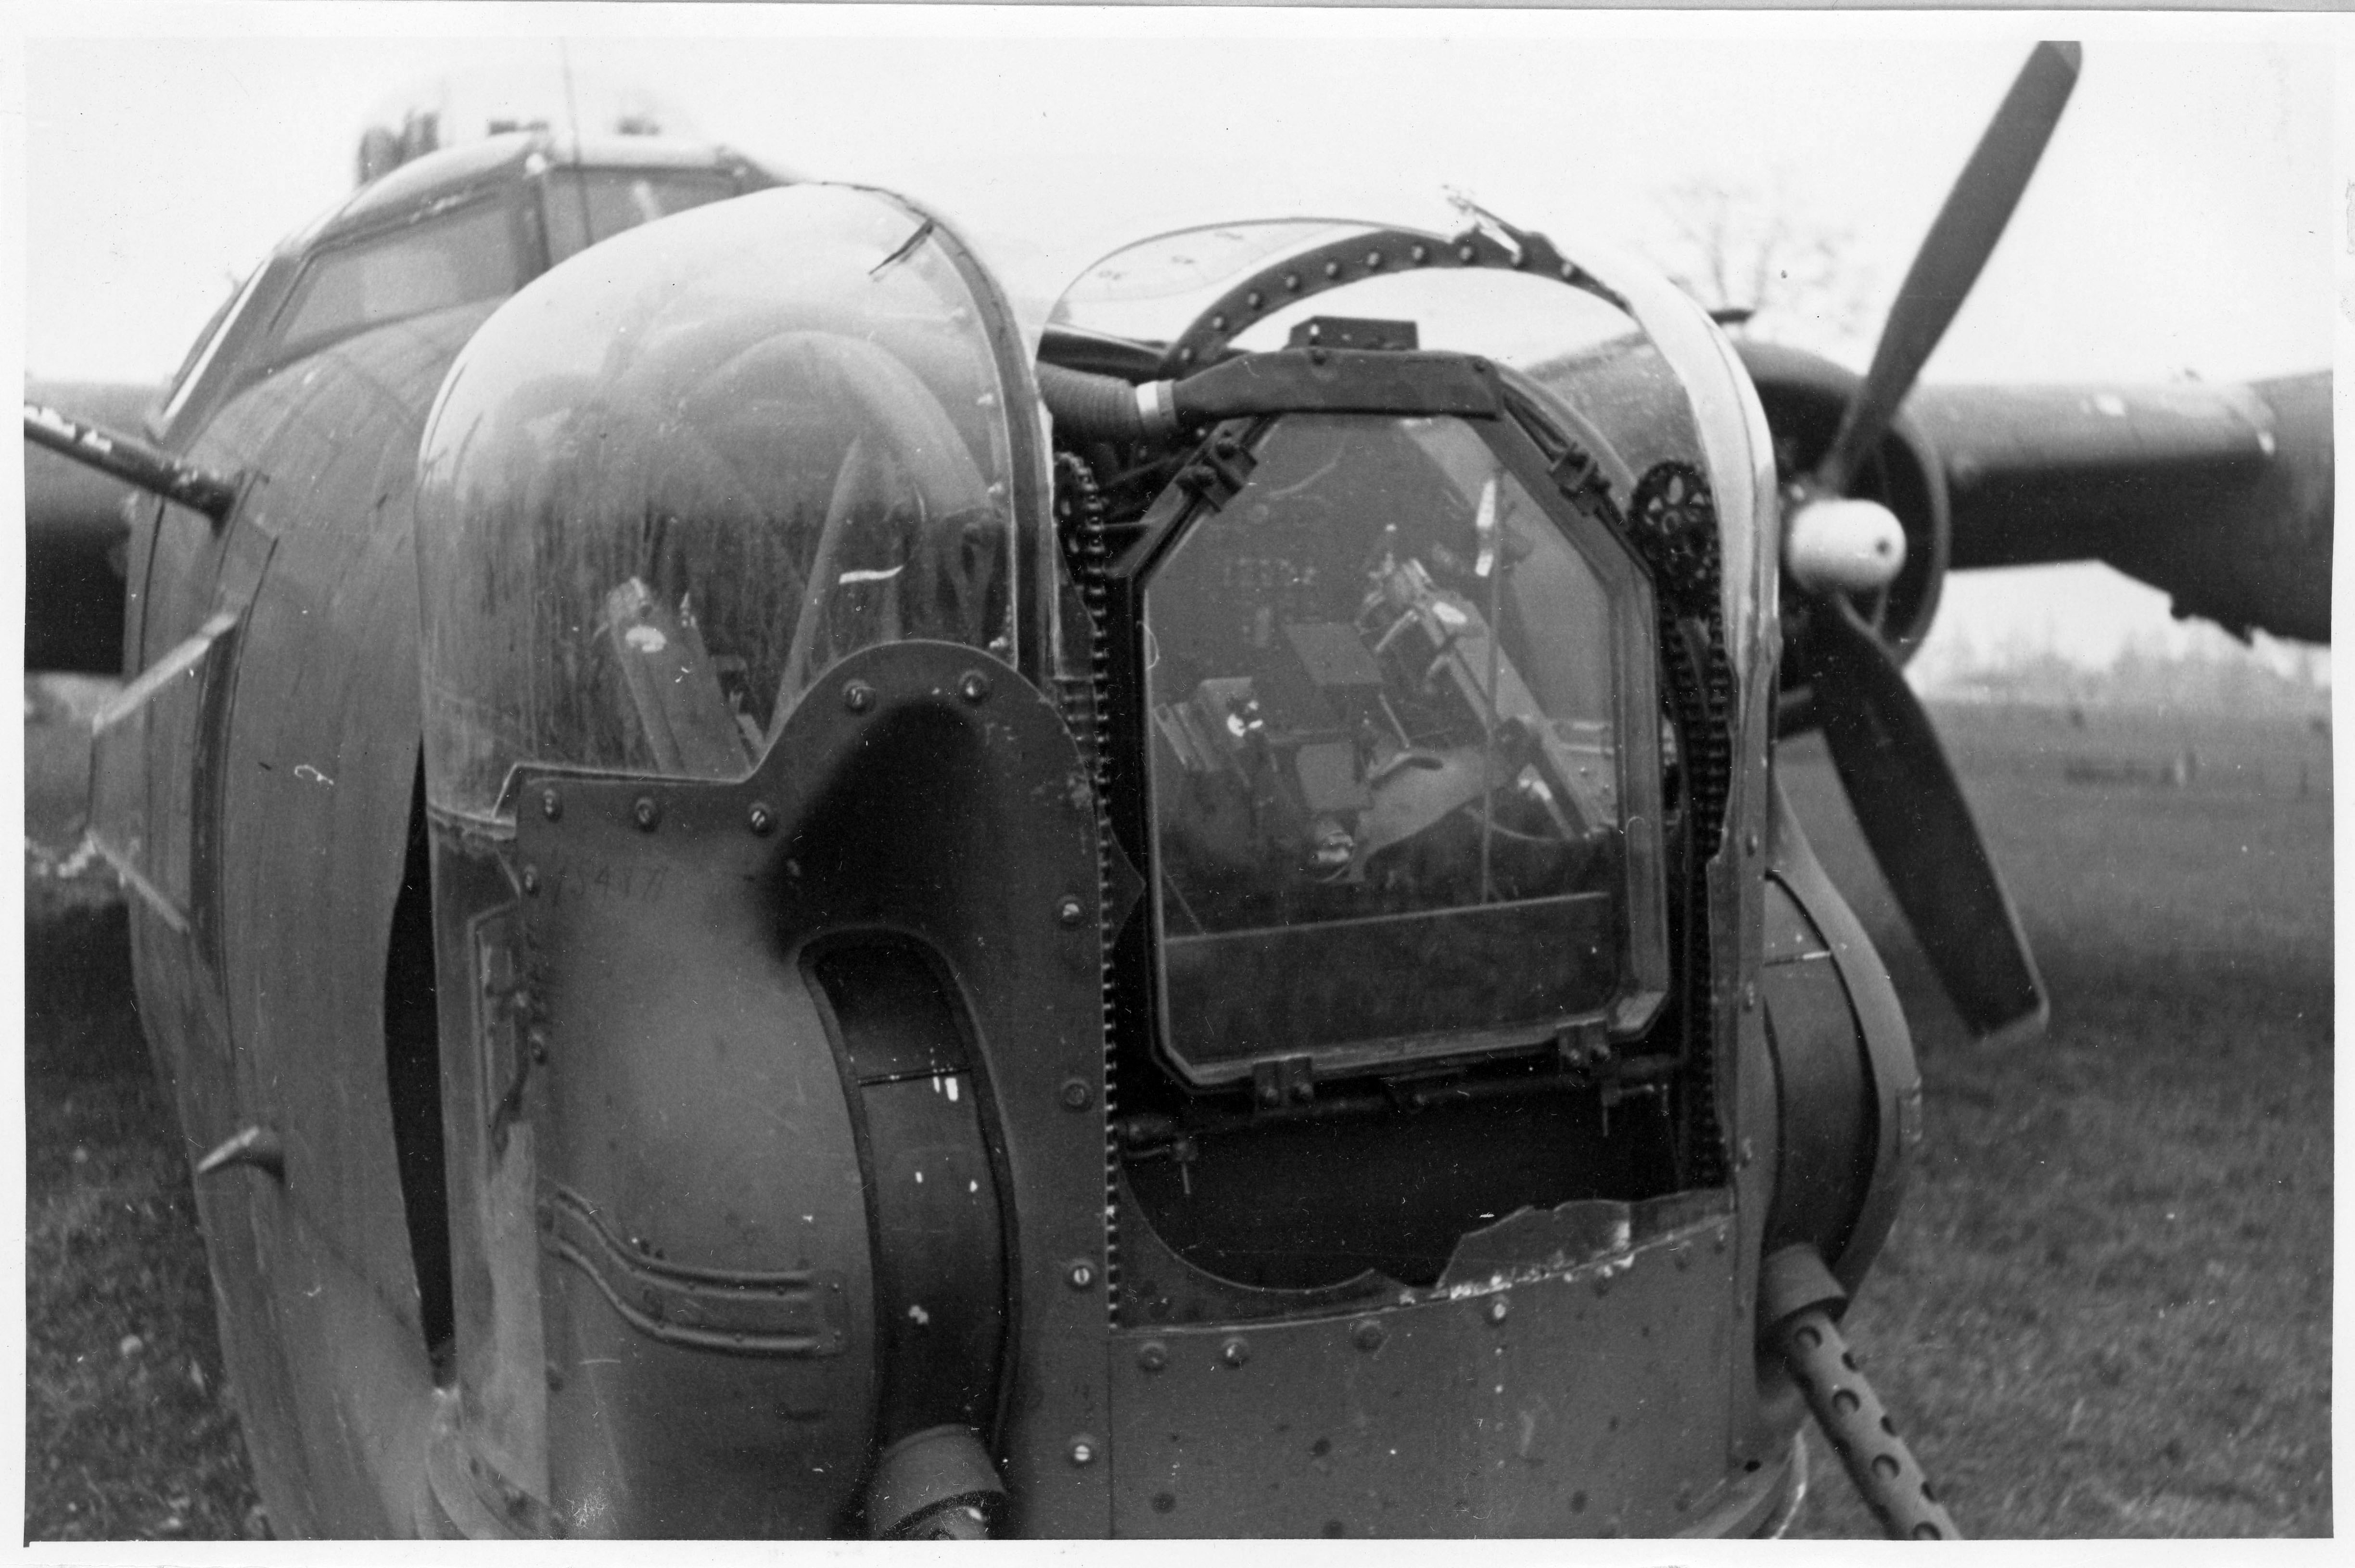 Bild 9 Bugturm mit Panzerglasscheibe und Antrieb.
Picture 9 Nose spire [sic] with armored glass pane and drive.
Comments: Another view of the A-15 turret. Immediately apparent are the pane of armored glass and elevation drives for the guns. There’s a small mystery here: How was the turret dome shattered? Flak? Fighters? During the plane’s landing?
______________________________
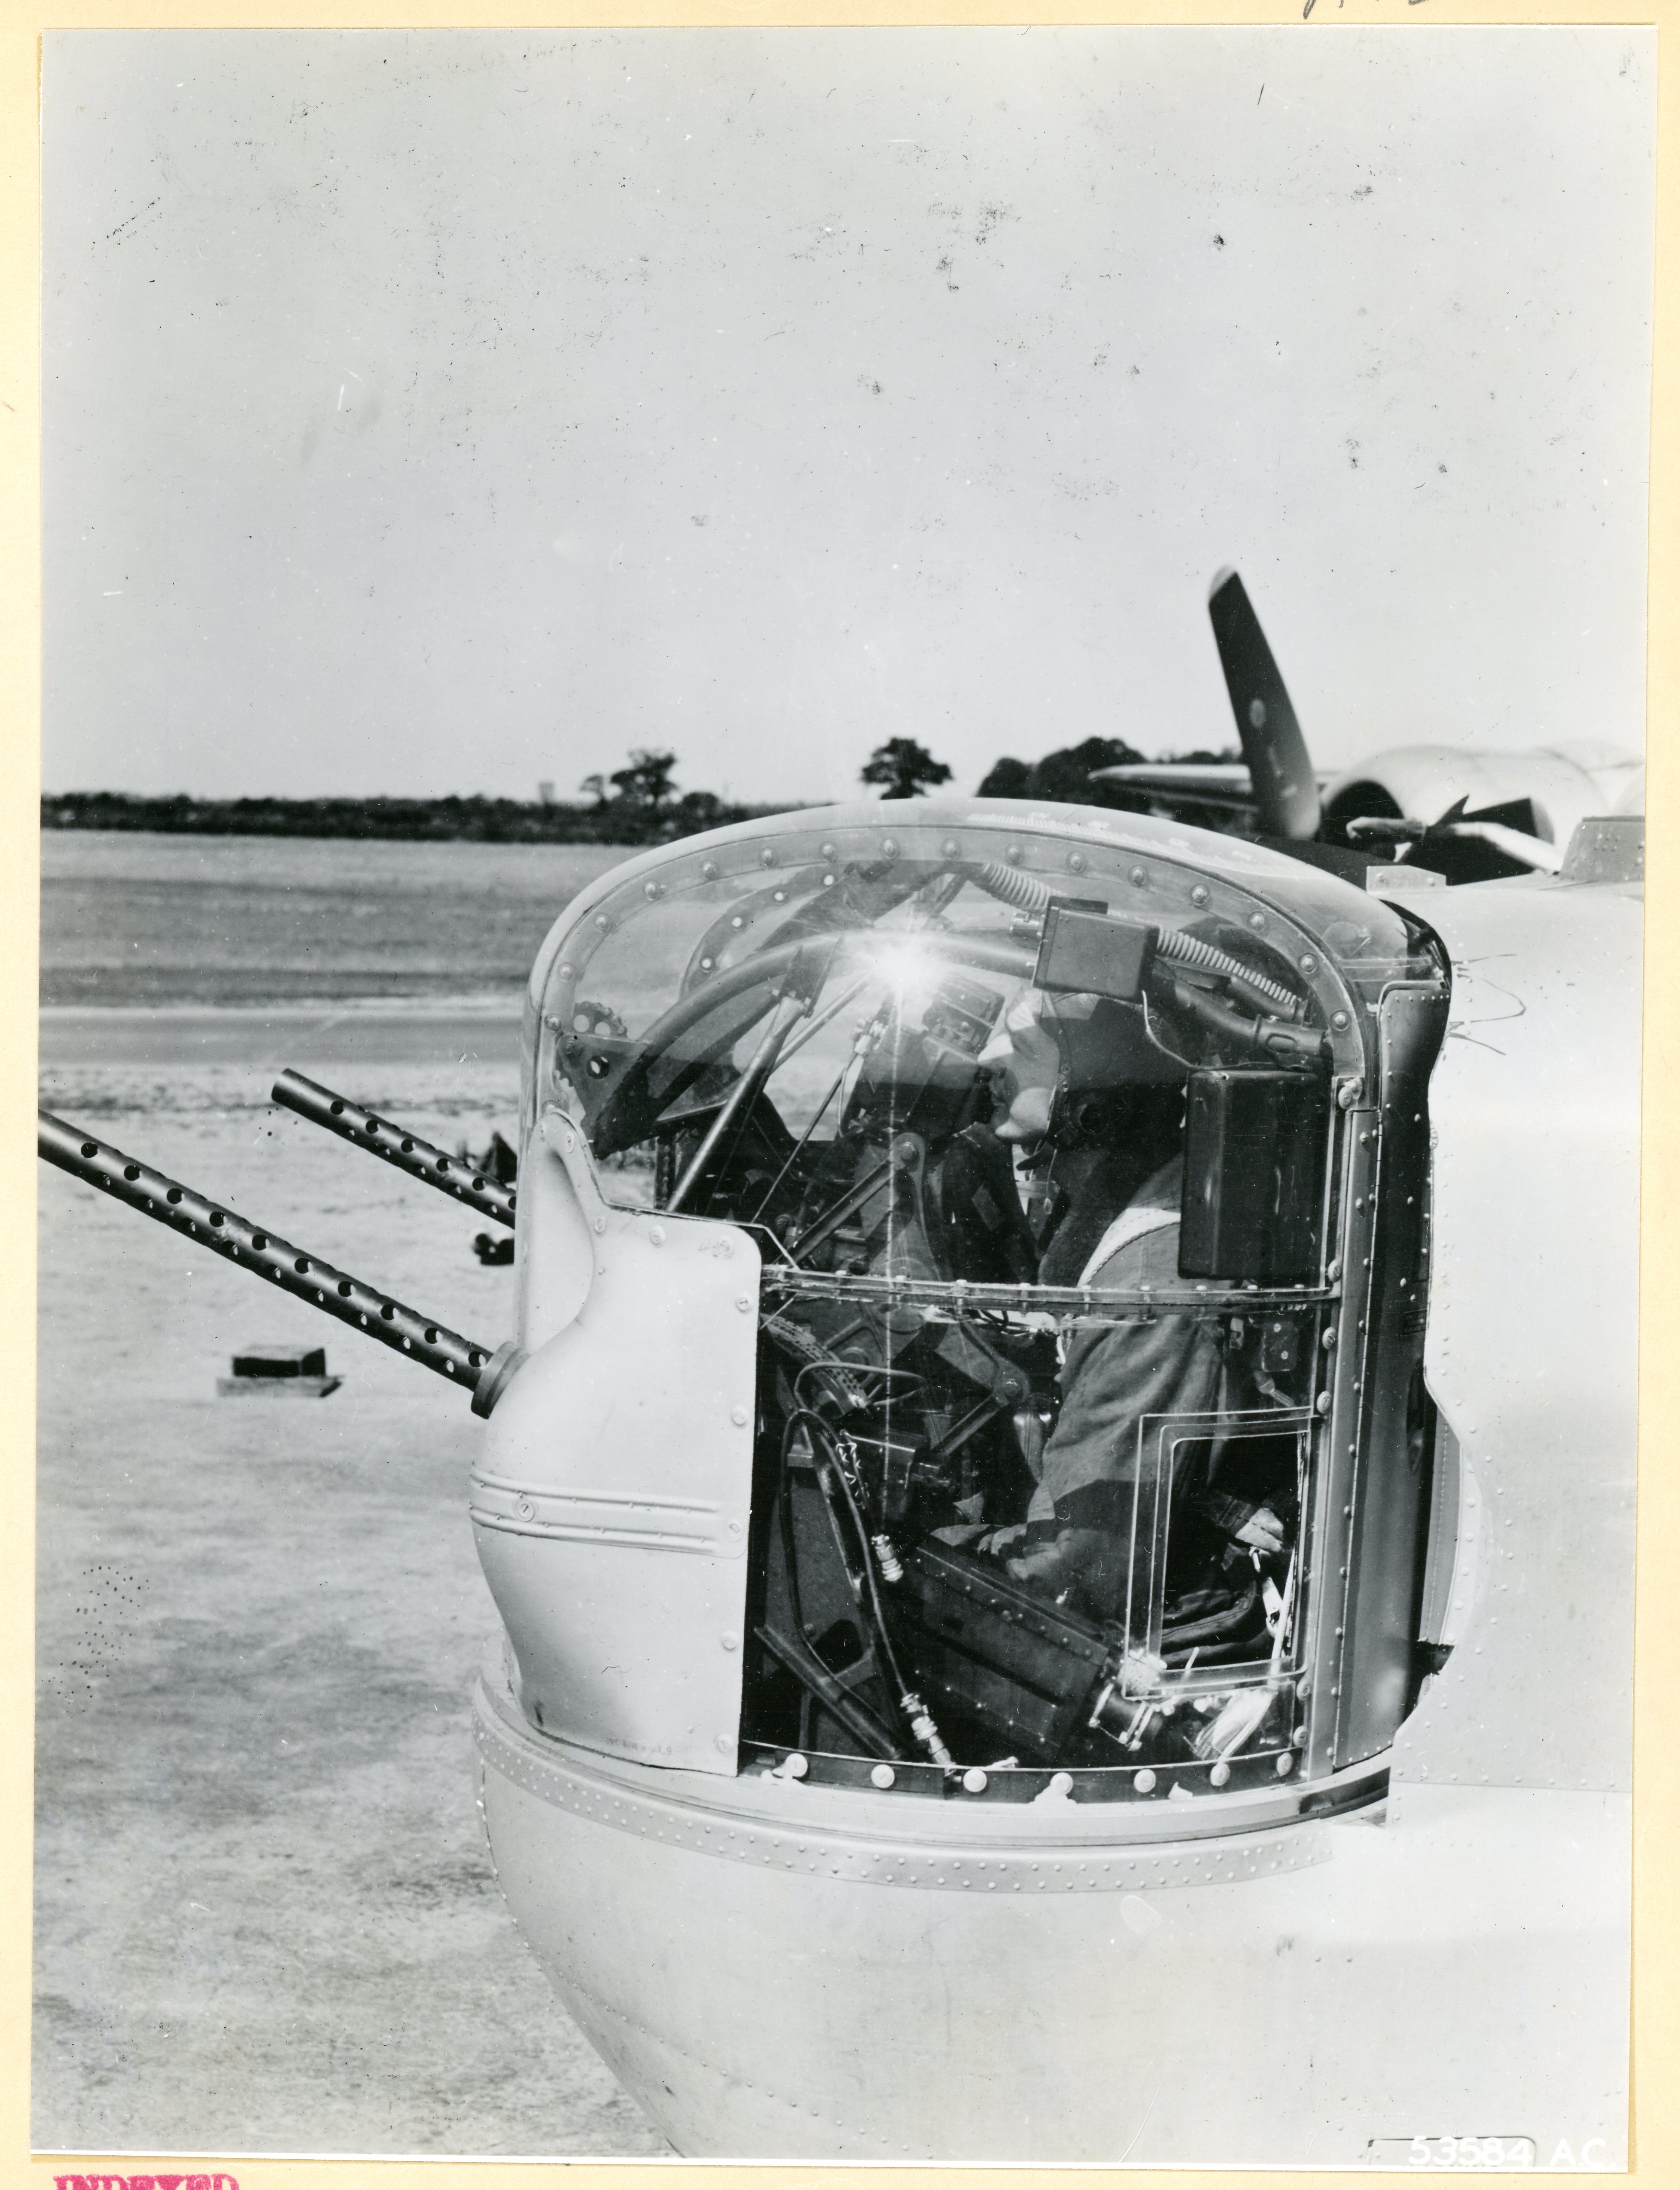 Comments: An excellent side view of an Emerson A-15 turret, albeit not from the KU Report. Instead, from Air Force Photo 53584AC / A12599. This picture illustrates an interesting aspect of the general design of the A-15, as opposed to the structure of dorsal aircraft turrets: The guns are located well below the gunner’s head and torso.
Caption: “ENGLAND – S/Sgt. Edward J. Mickey, a B-24 nose turret gunner, of Kingston, Pa., has 30 missions to his credit and holds the Distinguished Flying Cross and the Air Medal with 3 Oak Leaf Clusters. (53584AC / A12599)”
Here’s an interesting video (at the website of Hugh Fenlon) of an Emerson A-15 in operation, albeit not (!) in a B-24.
______________________________
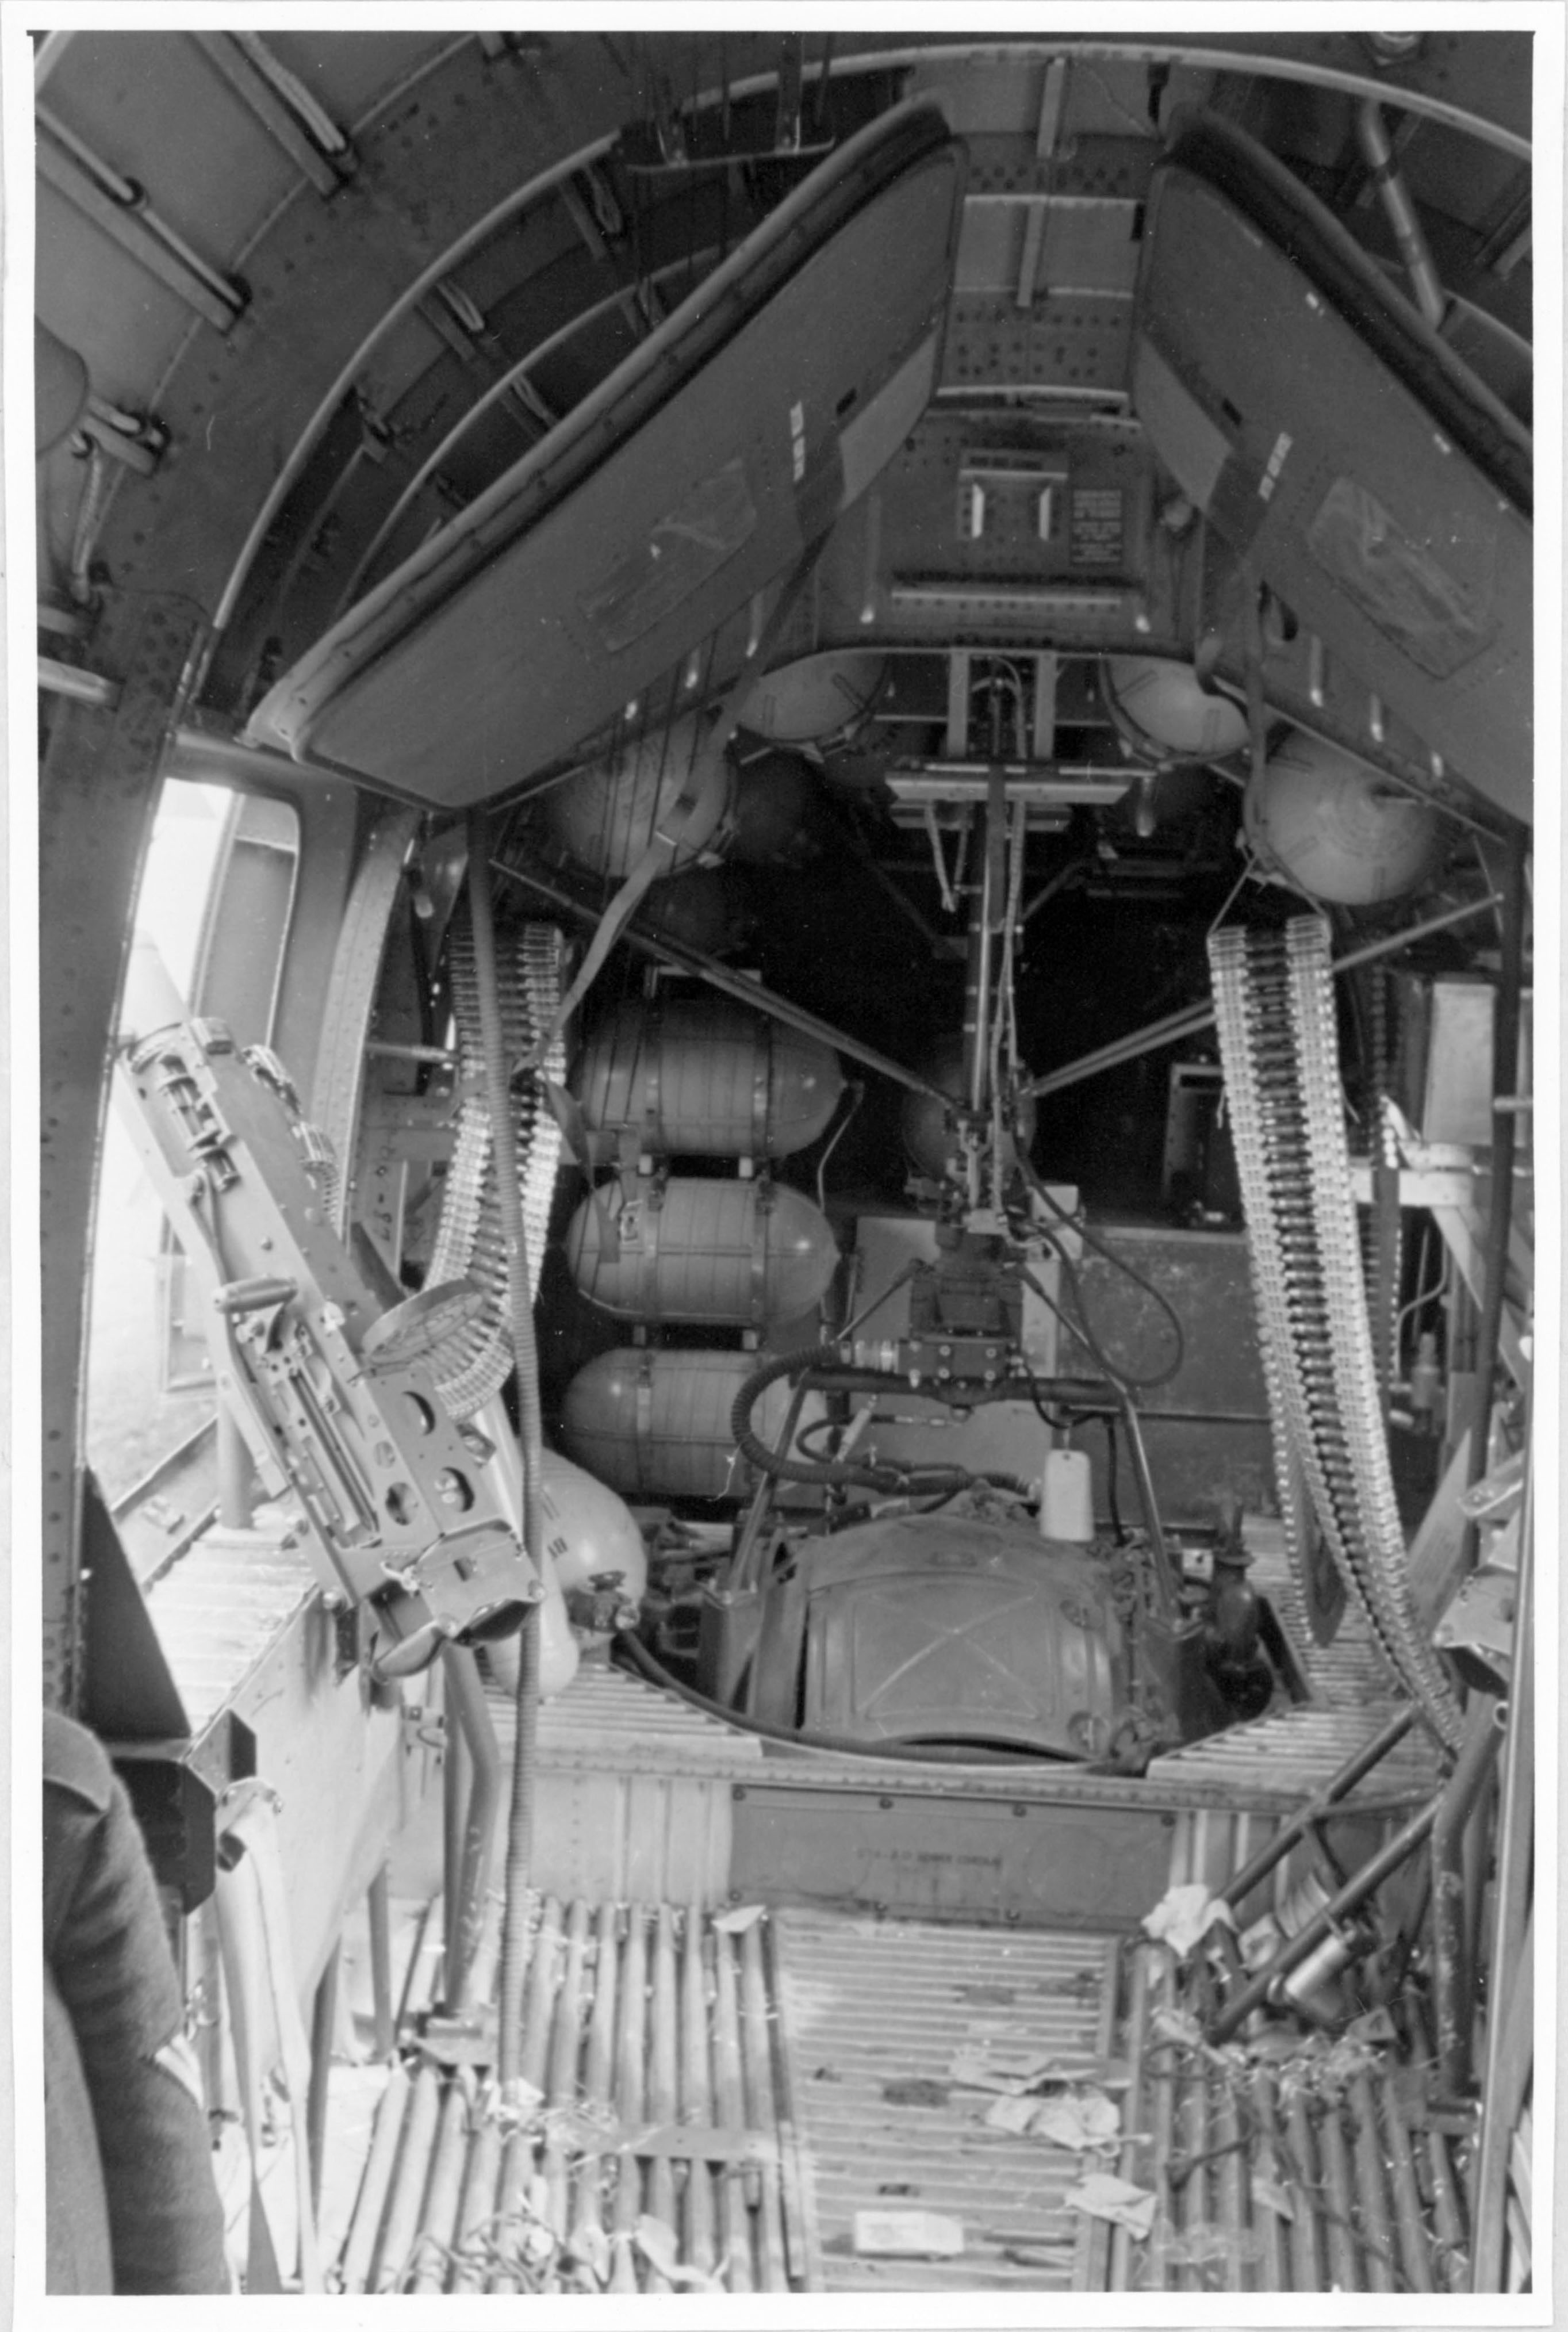 Bild 11 Blick in rückwärtigen Kabinenabschnitt mit MK-Kugel und Rumpfseitenständen.
Picture 11 View in the rear cabin section with machine-gun bullets and [trunk] sides
Comments: Fuselage interior, looking forward. This image provides an excellent view of the waist gun opening covers in their stowed positions, and, the location of oxygen bottles. The wind blast deflector for the port gun can be seen just ahead of the open waist window. These are the original “open” style B-24 waist gun positions that are neither staggered nor enclosed. According to Alan Blue’s book, that modification only commenced with Block H-20 Liberators.
______________________________
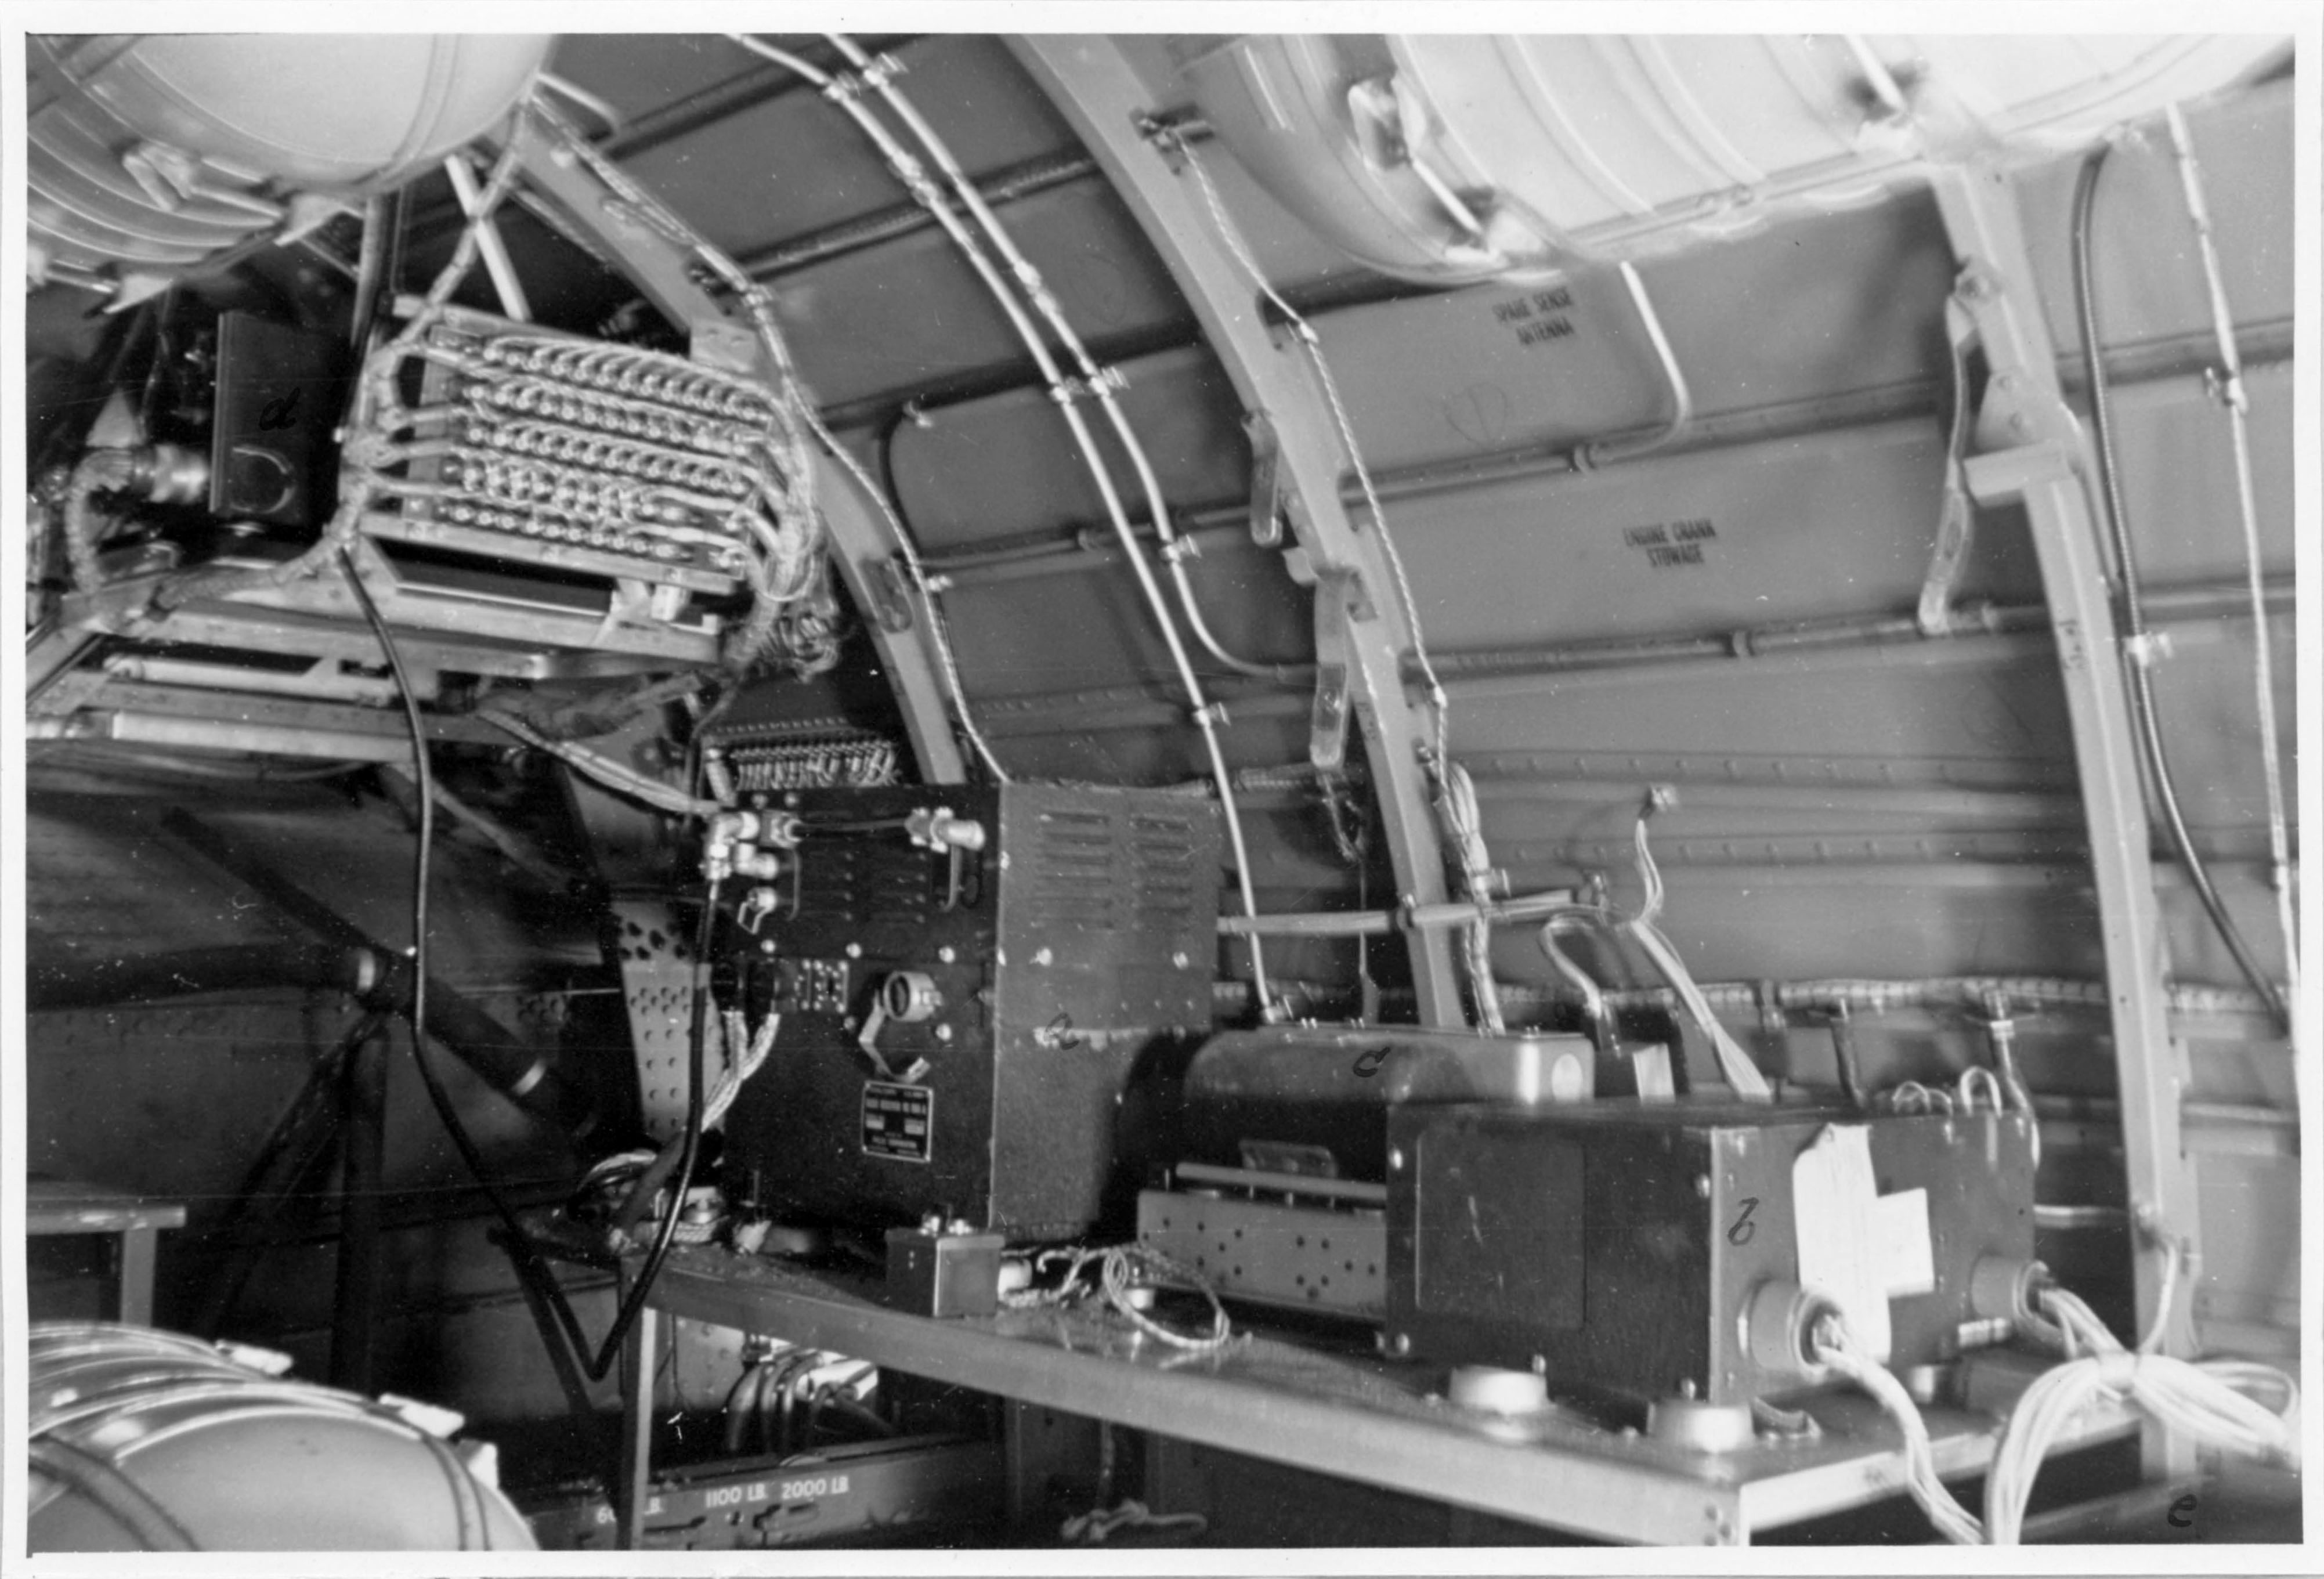 Bild 13 Blick auf ferngesteuerte FT-Geräte
a) BC – 966 – A
b) Stromversorgungsgerät für TR 5043
c) Modulator Unit BC – 456 – E
d) Radio Transmitter Unit BC – 433 – G
e) TR 5043
Picture 13 View of remote controlled FT devices
a) BC – 966 – A
b) Power device for TR 5043
c) Modulator unit BC – 456 – E
d) Radio transmitter unit BC – 433 – G
e) TR 504
______________________________
 Bild 14 Die schwenkbaren Rumpfseitenwaffen mit Kreiskornvisier ohne Rücklaufbremse.
Picture 14 The swivel[ing] fuselage side weapons with a circular horn sight without a return brake.
Comments: The simple circular ring-and-bead gunsight mounted atop the waist machine guns.
______________________________
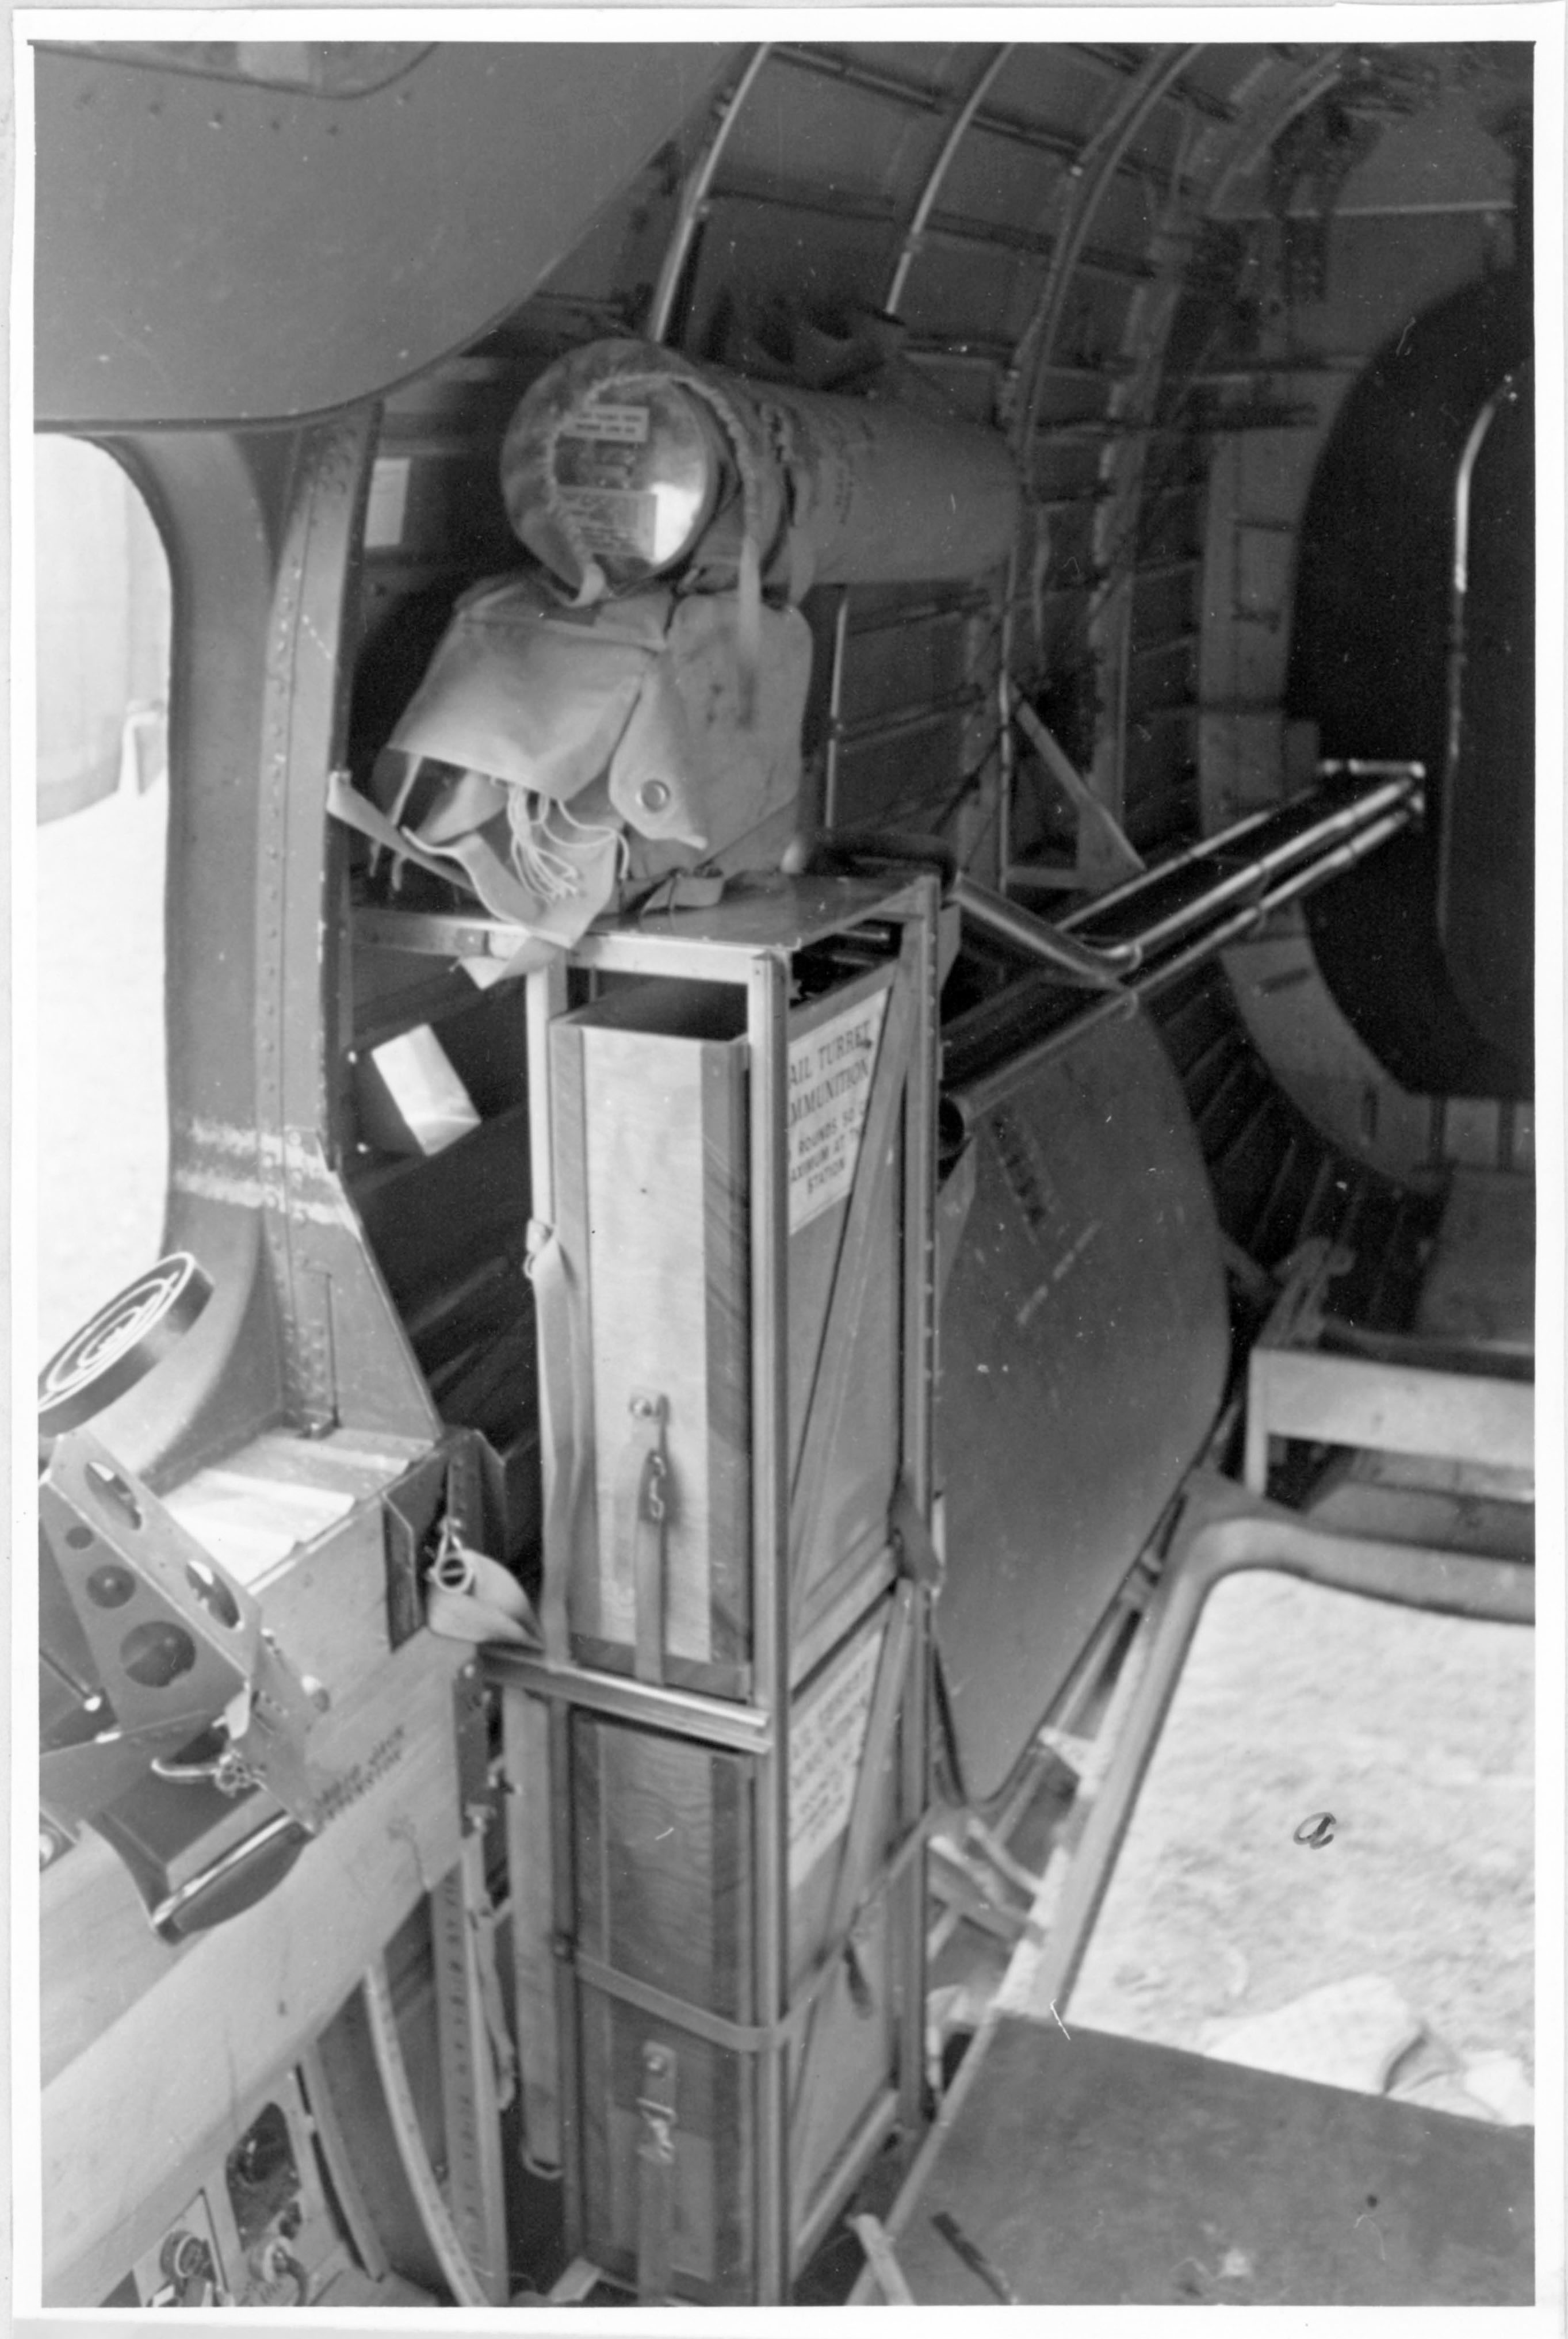 Bild 12 Unterbringung der Munitionskästen für Heckstand an der rechten Bordwand hinter dem rechten Fenster. Darüber Seenotsender mit Zubehöirbehälter.
a) Ausstiegklappe für Besatzung als auch Agenten und Sabotagebehältern.
Picture 12 Accommodation of the ammunition boxes for the rear deck on the right side of the vehicle behind the right window. Above that, distress transmitter with accessory container.
a) The exit flap for crew as well as agents and sabotage containers.
Comments: Tail turret ammunition storage box, and ventral entry / escape hatch in open (stowed) position.
______________________________
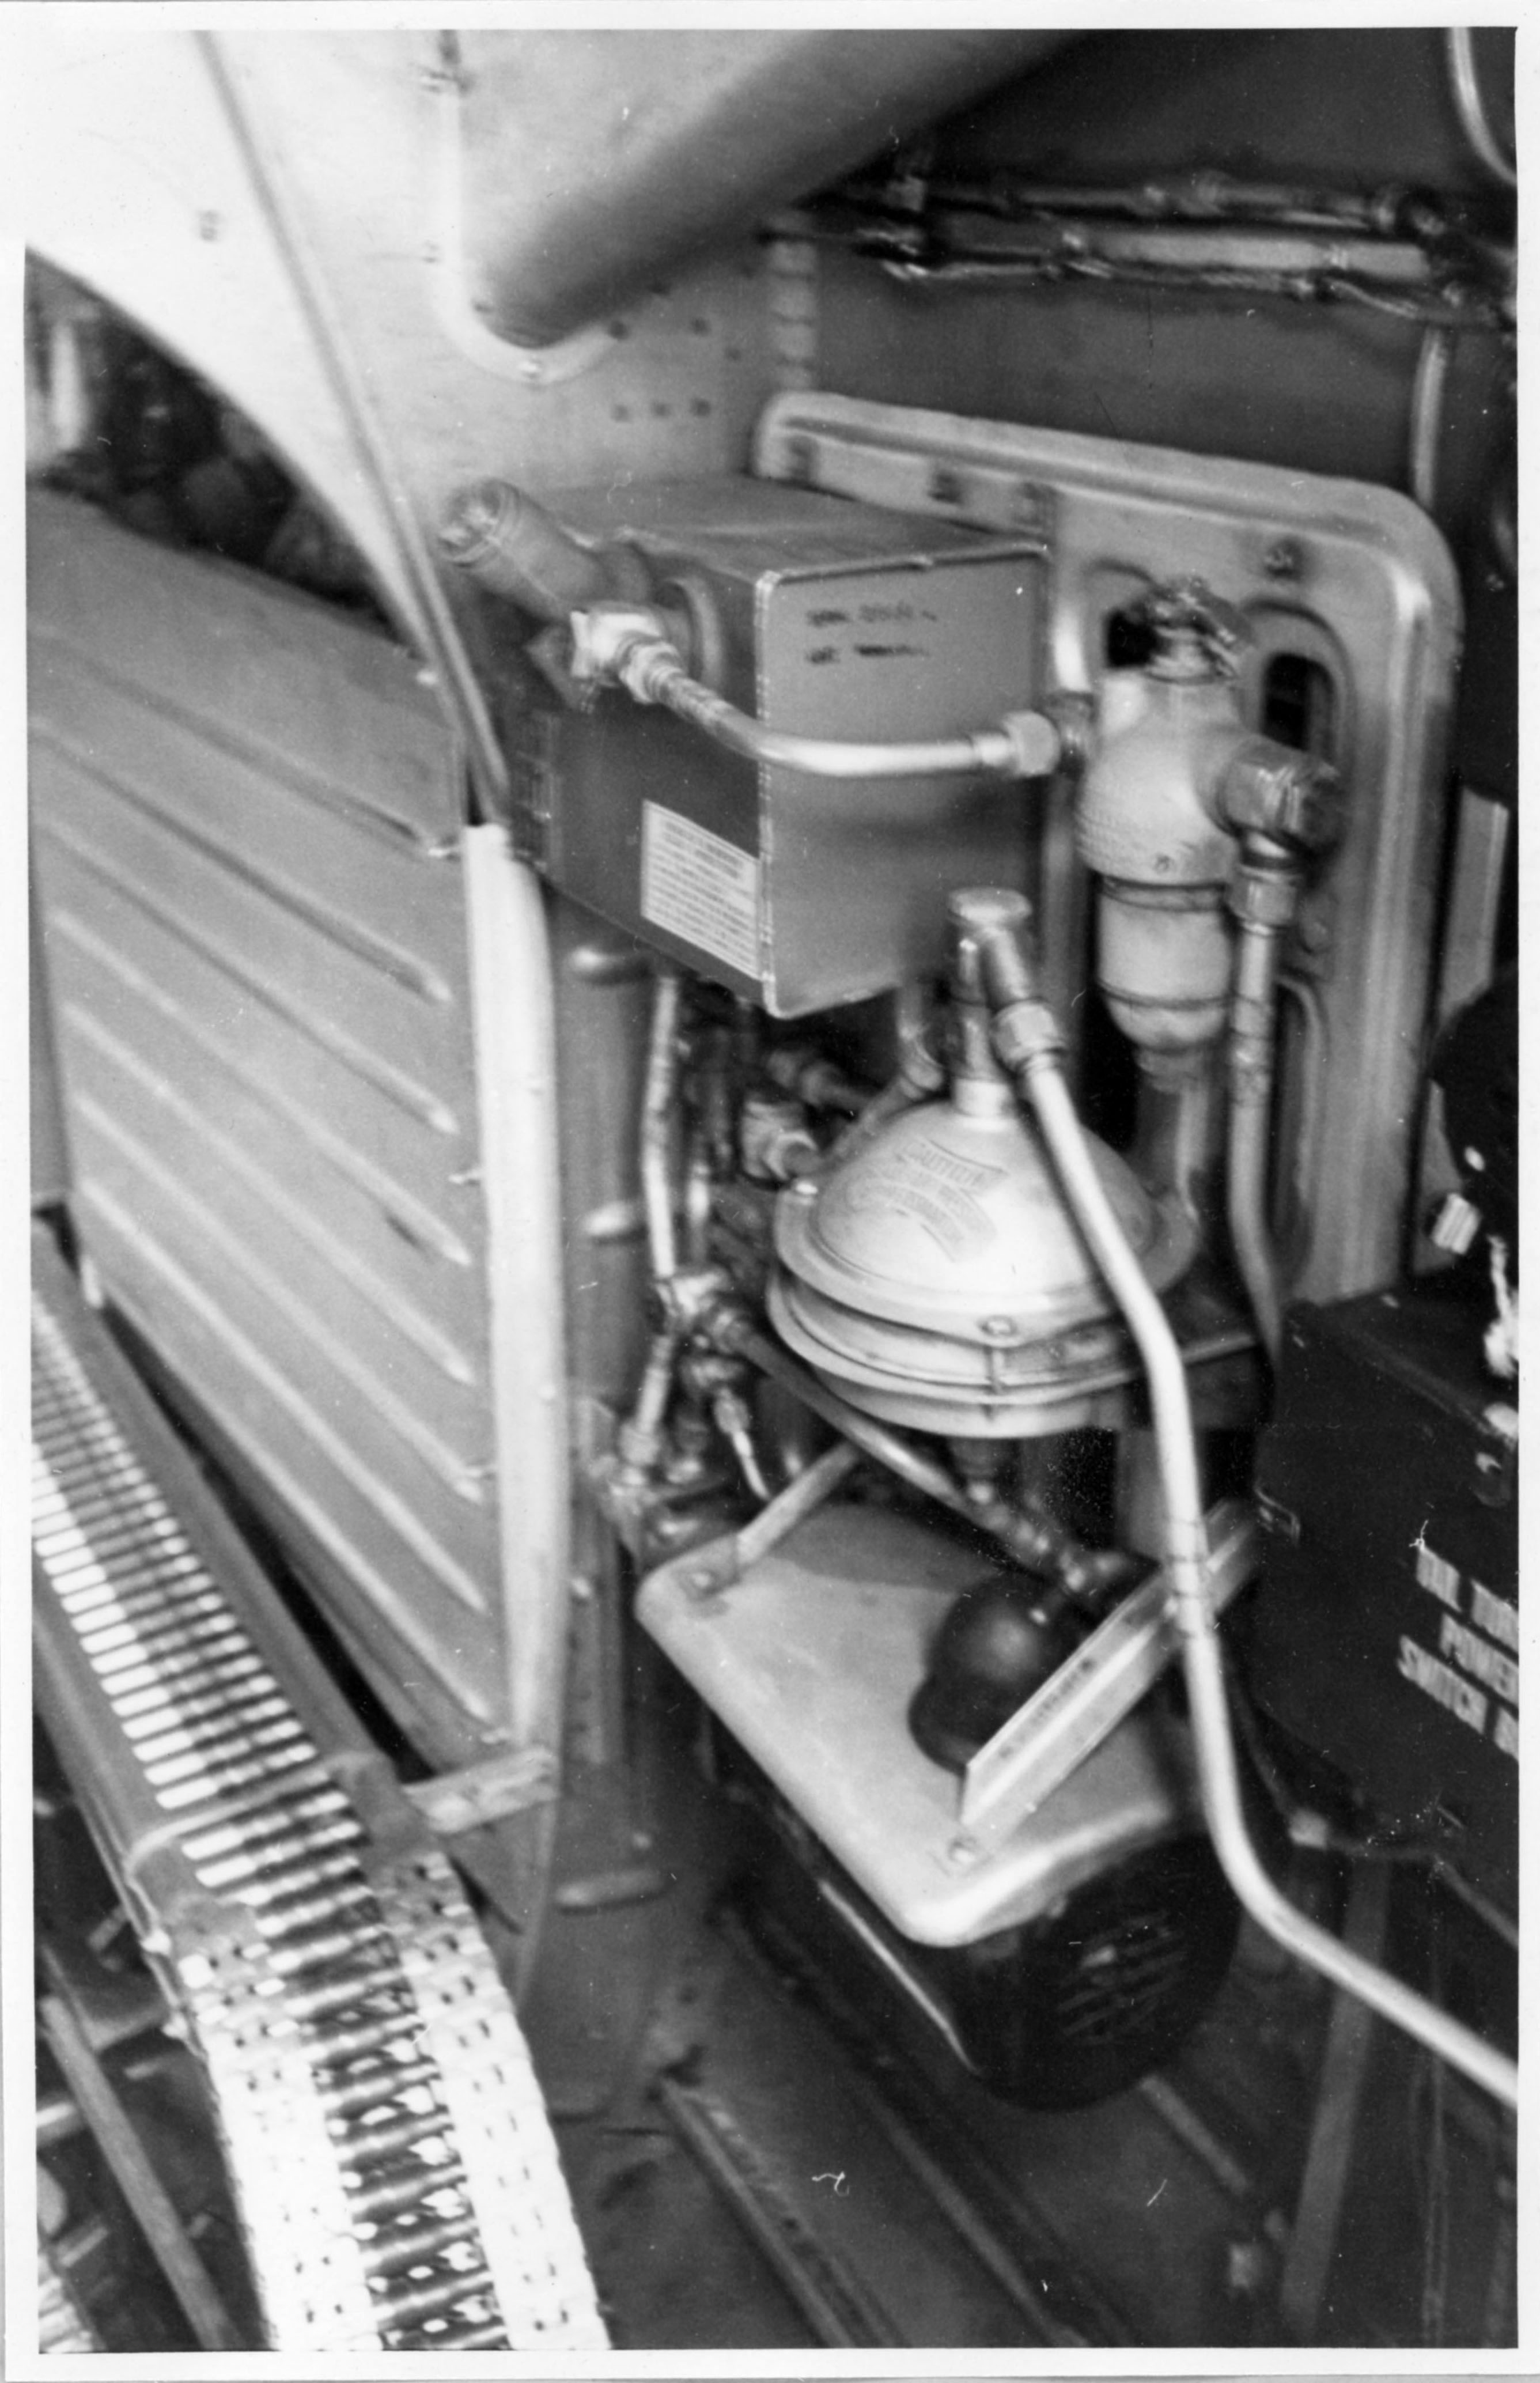 Bild 15 Hydraulicbrett an der rechten Bordwand vor Heckstand.
Picture 15 Hydraulic board on the right side of the vehicle in front of the tail.
______________________________
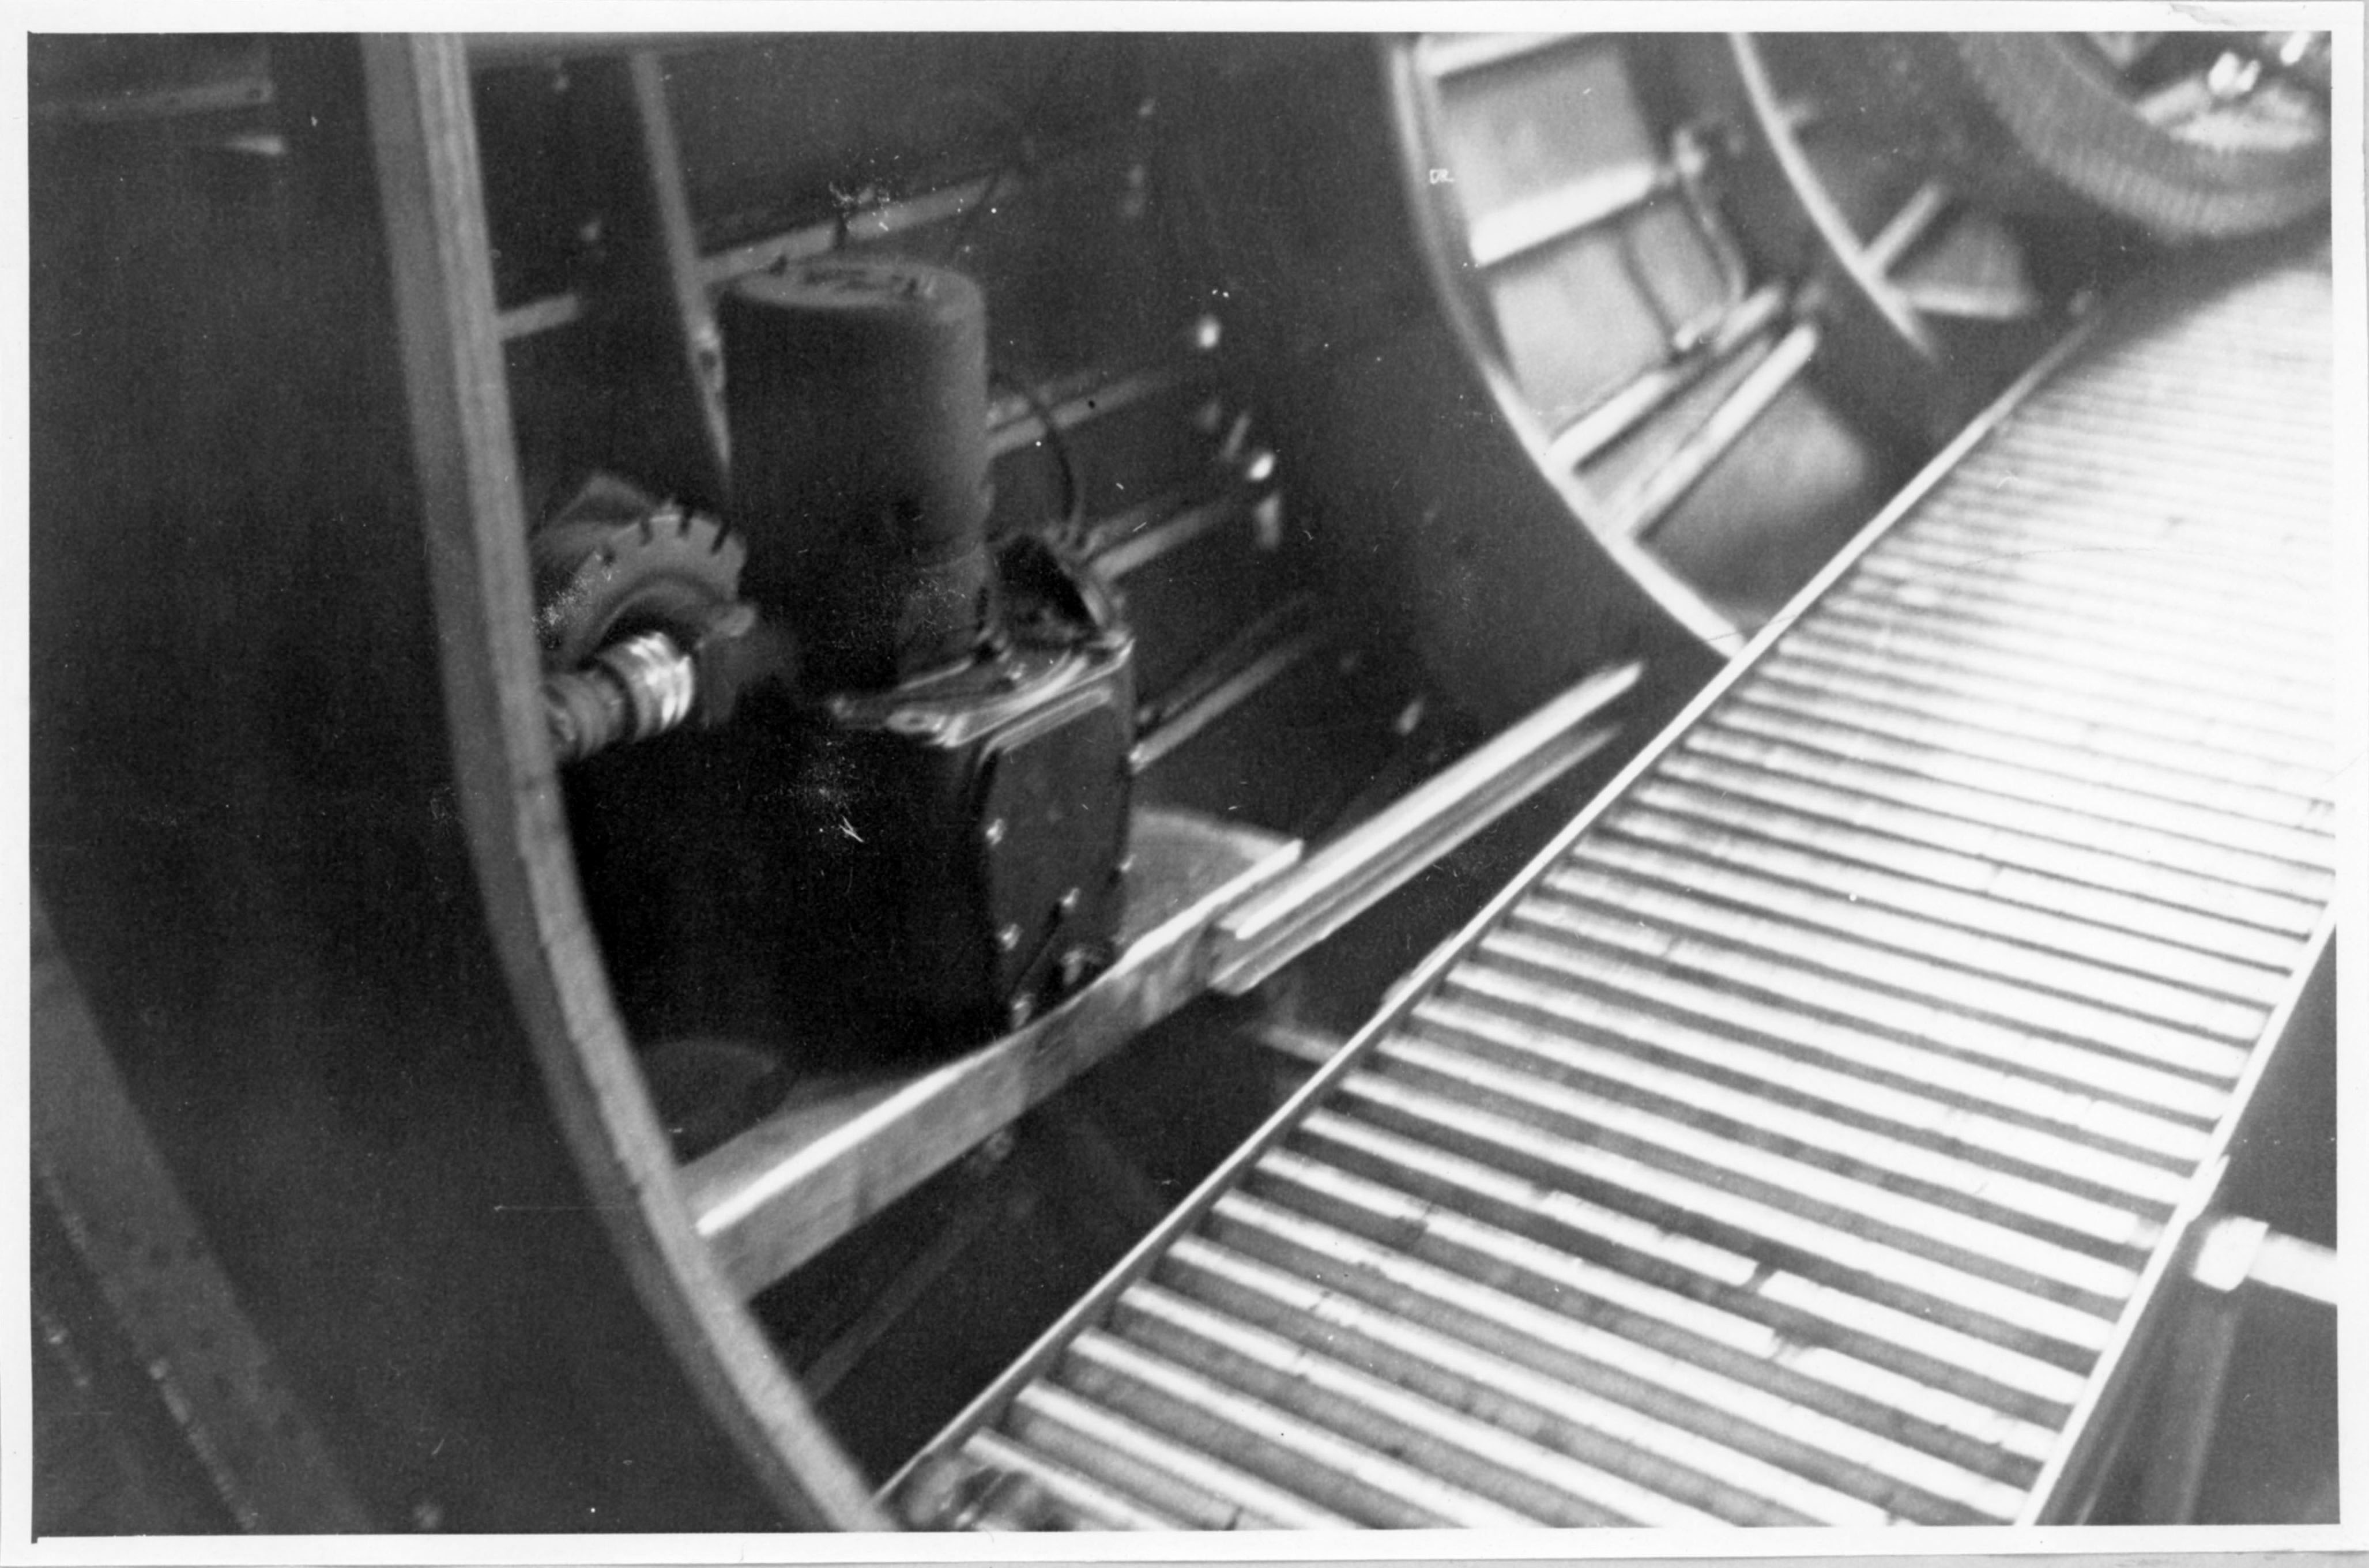 Bild 16 Servomotor für Seiten- und Höhenruder der Kurssteurerg A 5. Sitz des Gerätes in Flugrichtung hinter der Trennwand des Heckraumes.
Picture 16 Servomotor for side and height control of the steering wheel A 5. Seat of the device in the direction of flight behind the partition of the rear compartment.
______________________________
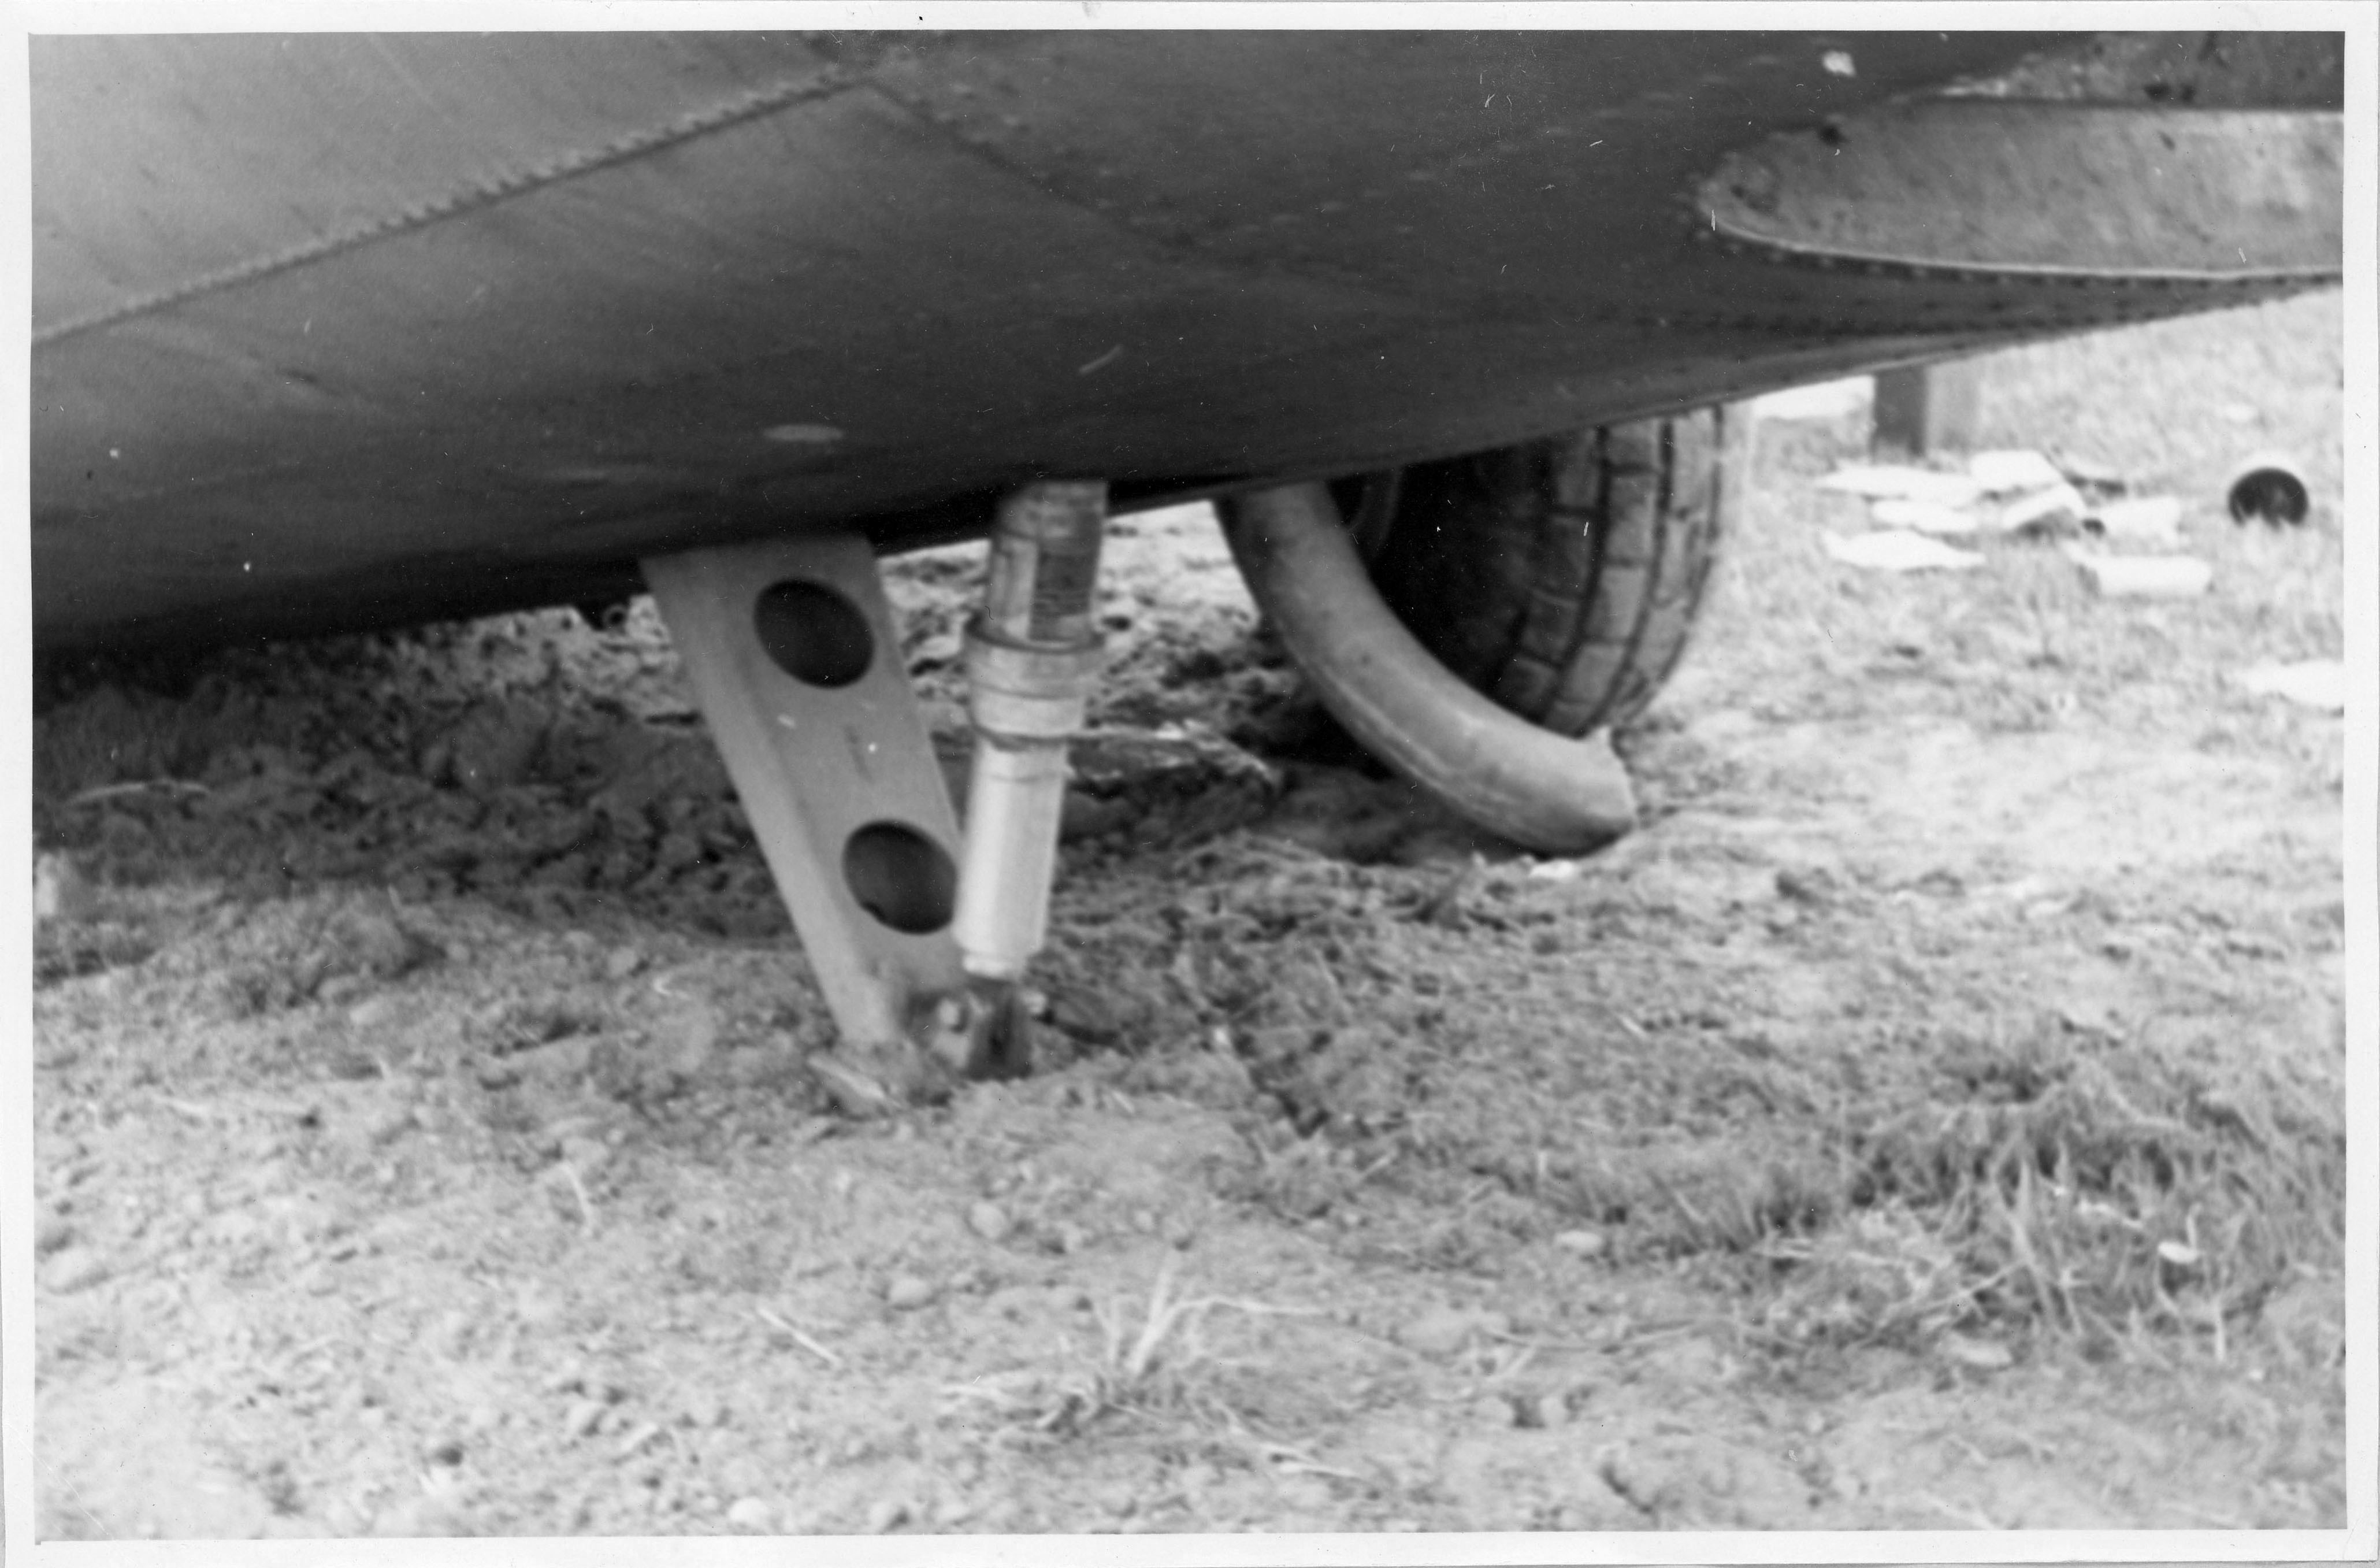 Bild 8 Ausgefahrener Notsporn
Picture 8 Extended emergency skid
______________________________
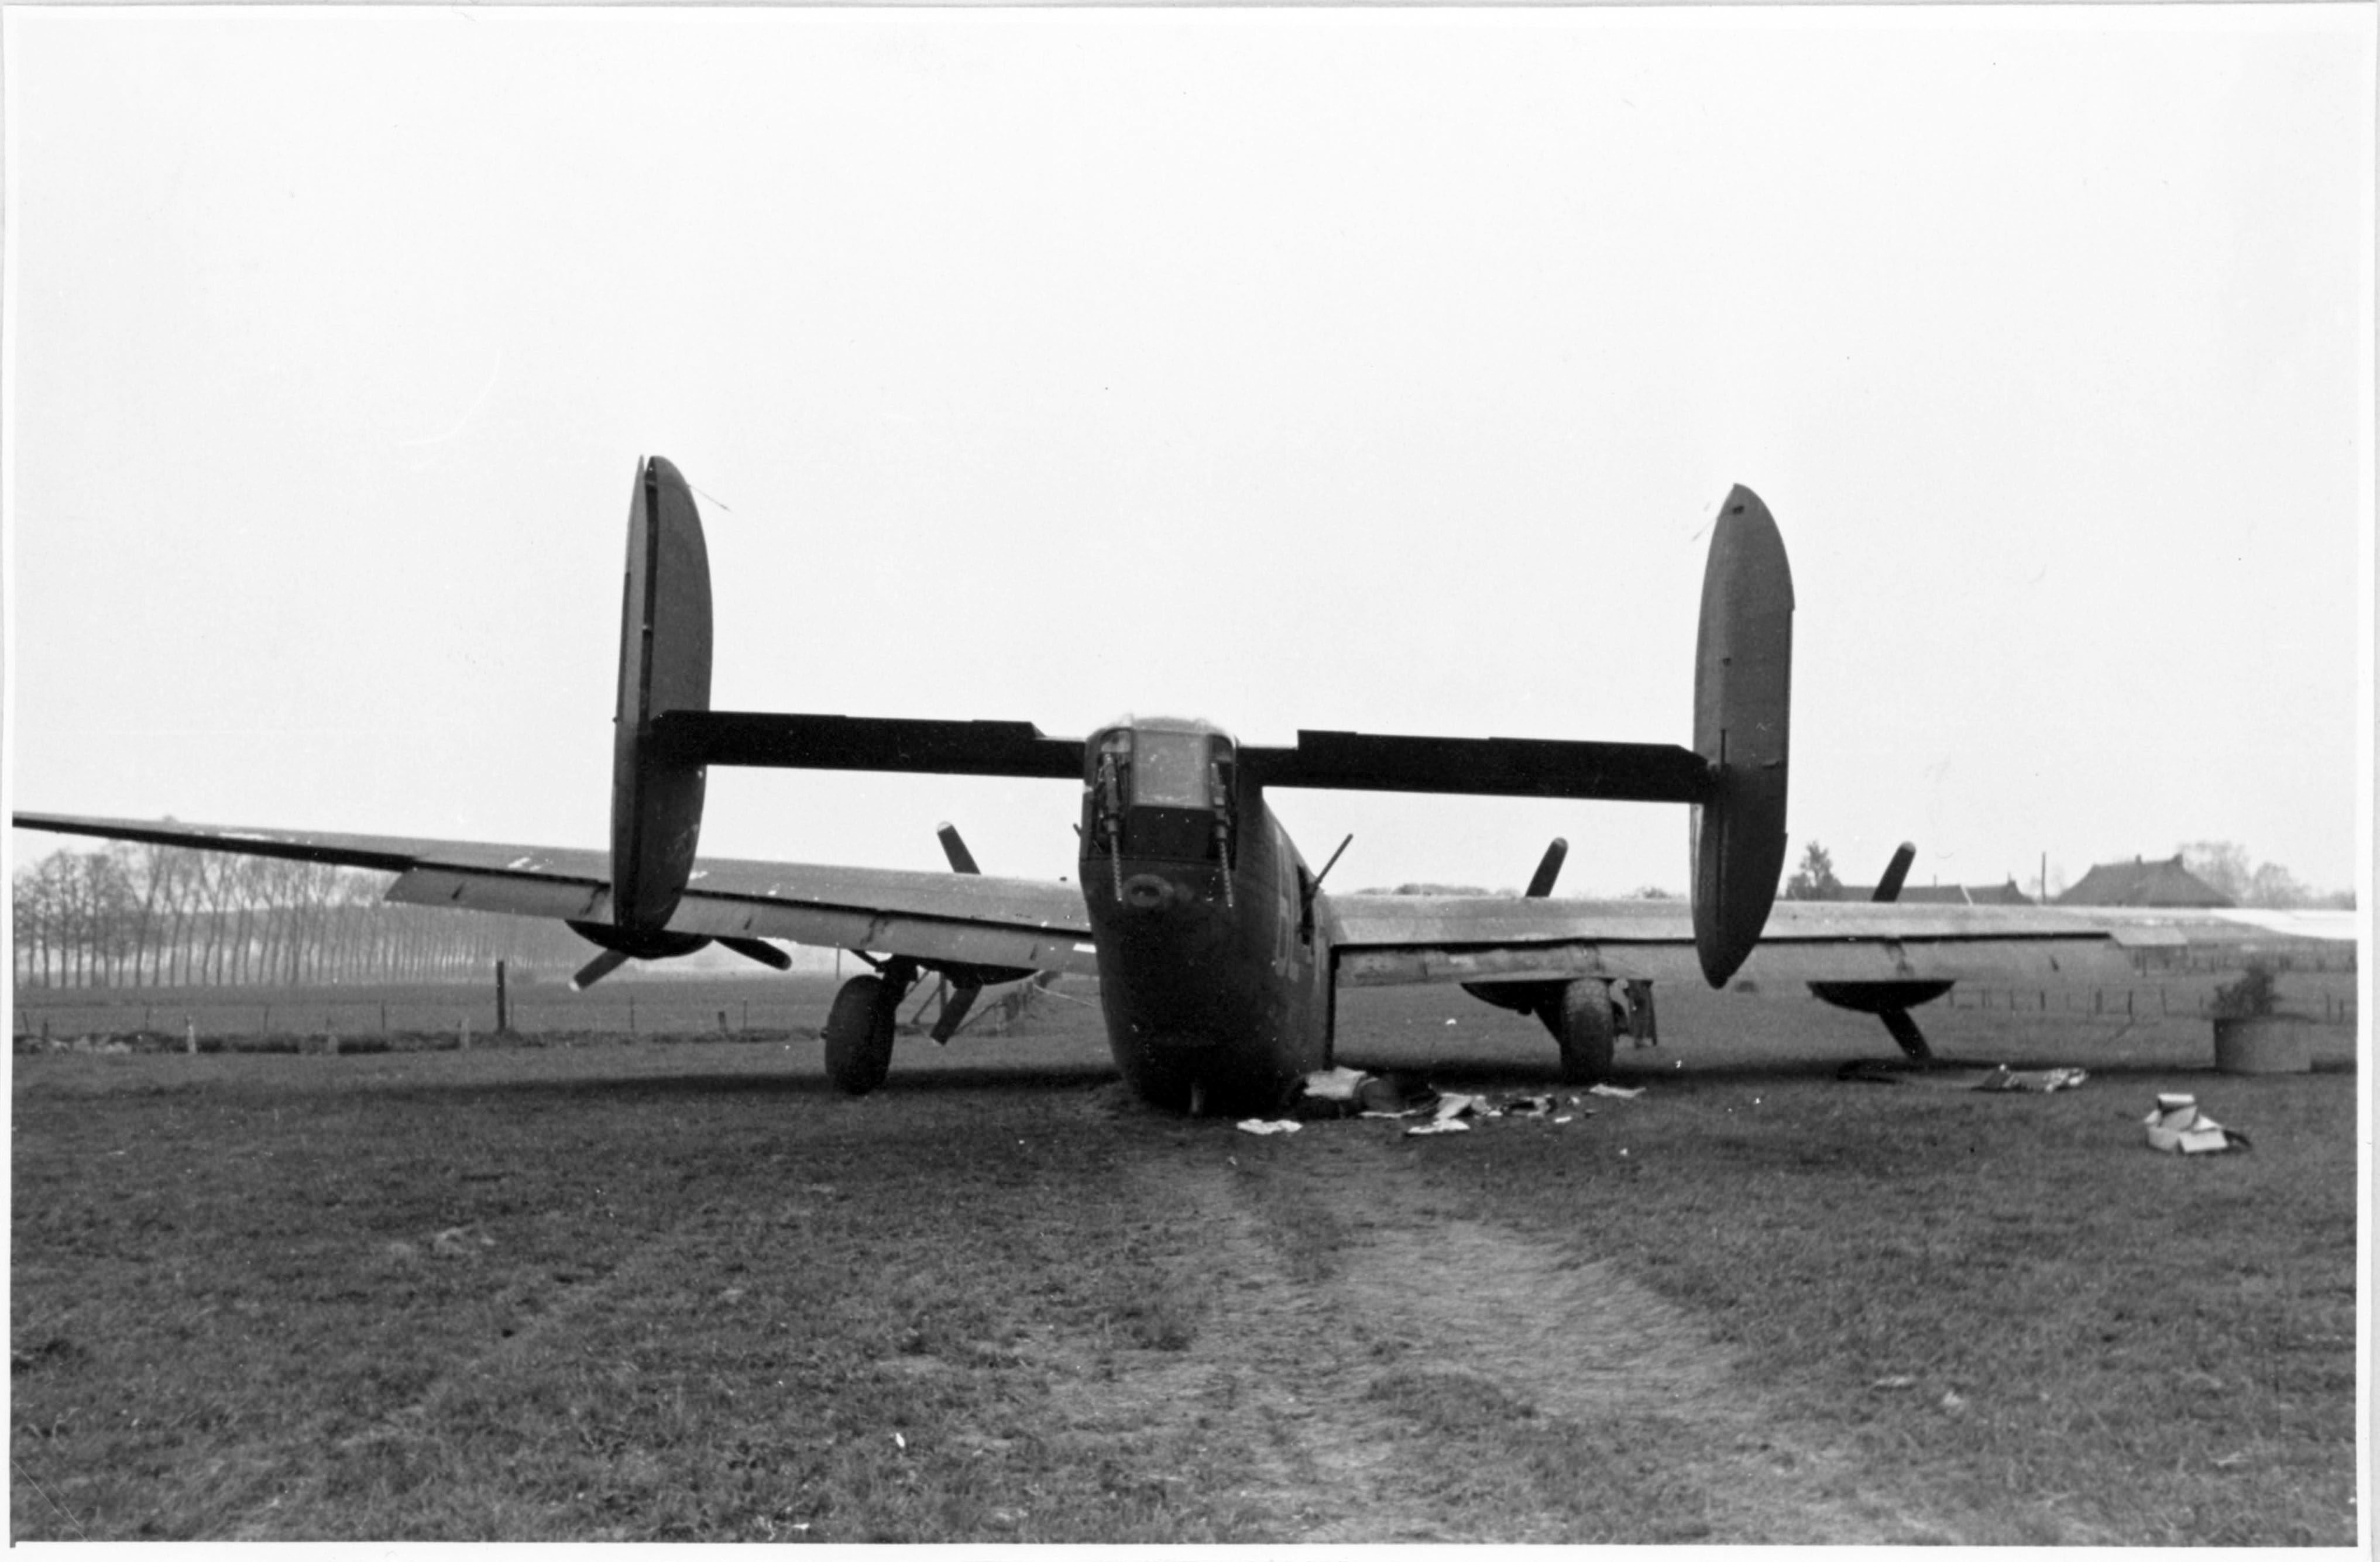 Bild 2 Ansicht der Maschine von hinten. Man beachte das weggeknickte Fahrwerk.
Picture 2 View of the machine from behind. Note the bent landing gear.
Bild 3 Rumpfende mit Leiwerk und Staffelkenner.
Picture 3 Fuselage tail with body work and [squadron signal light].
______________________________
There ends the tail – literally (ahem! – pardon the pun!), and figuratively – of Tell Me More. The photos tell the story of a single B-24 Liberator – of very, very many – that was lost in the air war against Germany in the Second World War.
Certainly every man in the plane’s crew certainly had his own, much more human story, as well: Of attempted evasion, eventual capture, and ultimately liberation and freedom. I have no way of knowing if in the decades since 1945 those stories were recorded and preserved – especially as suggested by the inscription on the tombstone of Lt. Robert Willson – but it would be nice to think they have been.
So, let this collection of photos stand as a symbol of a past that should not be forgotten.
______________________________
References
The B-24 Liberator
Birdsall, Steve, B-24 Liberator in Action (Aircraft No. 21), (Illustrated by Don Greer), Squadron/Signal Publications, Inc., Carrollton, Tx., 1975
Blue, Allan G., The B-24 Liberator – A Pictorial History, Charles Scribner’s Sons, New York, N.Y., 1975
Davis, Larry B-24 Liberator in Action (Aircraft No. 80), (Illustrated by Perry Manley), Squadron/Signal Publications, Inc., Carrollton, Tx., 1987
Joe Baugher’s list of B-24 serial numbers, at JoeBaugher.com
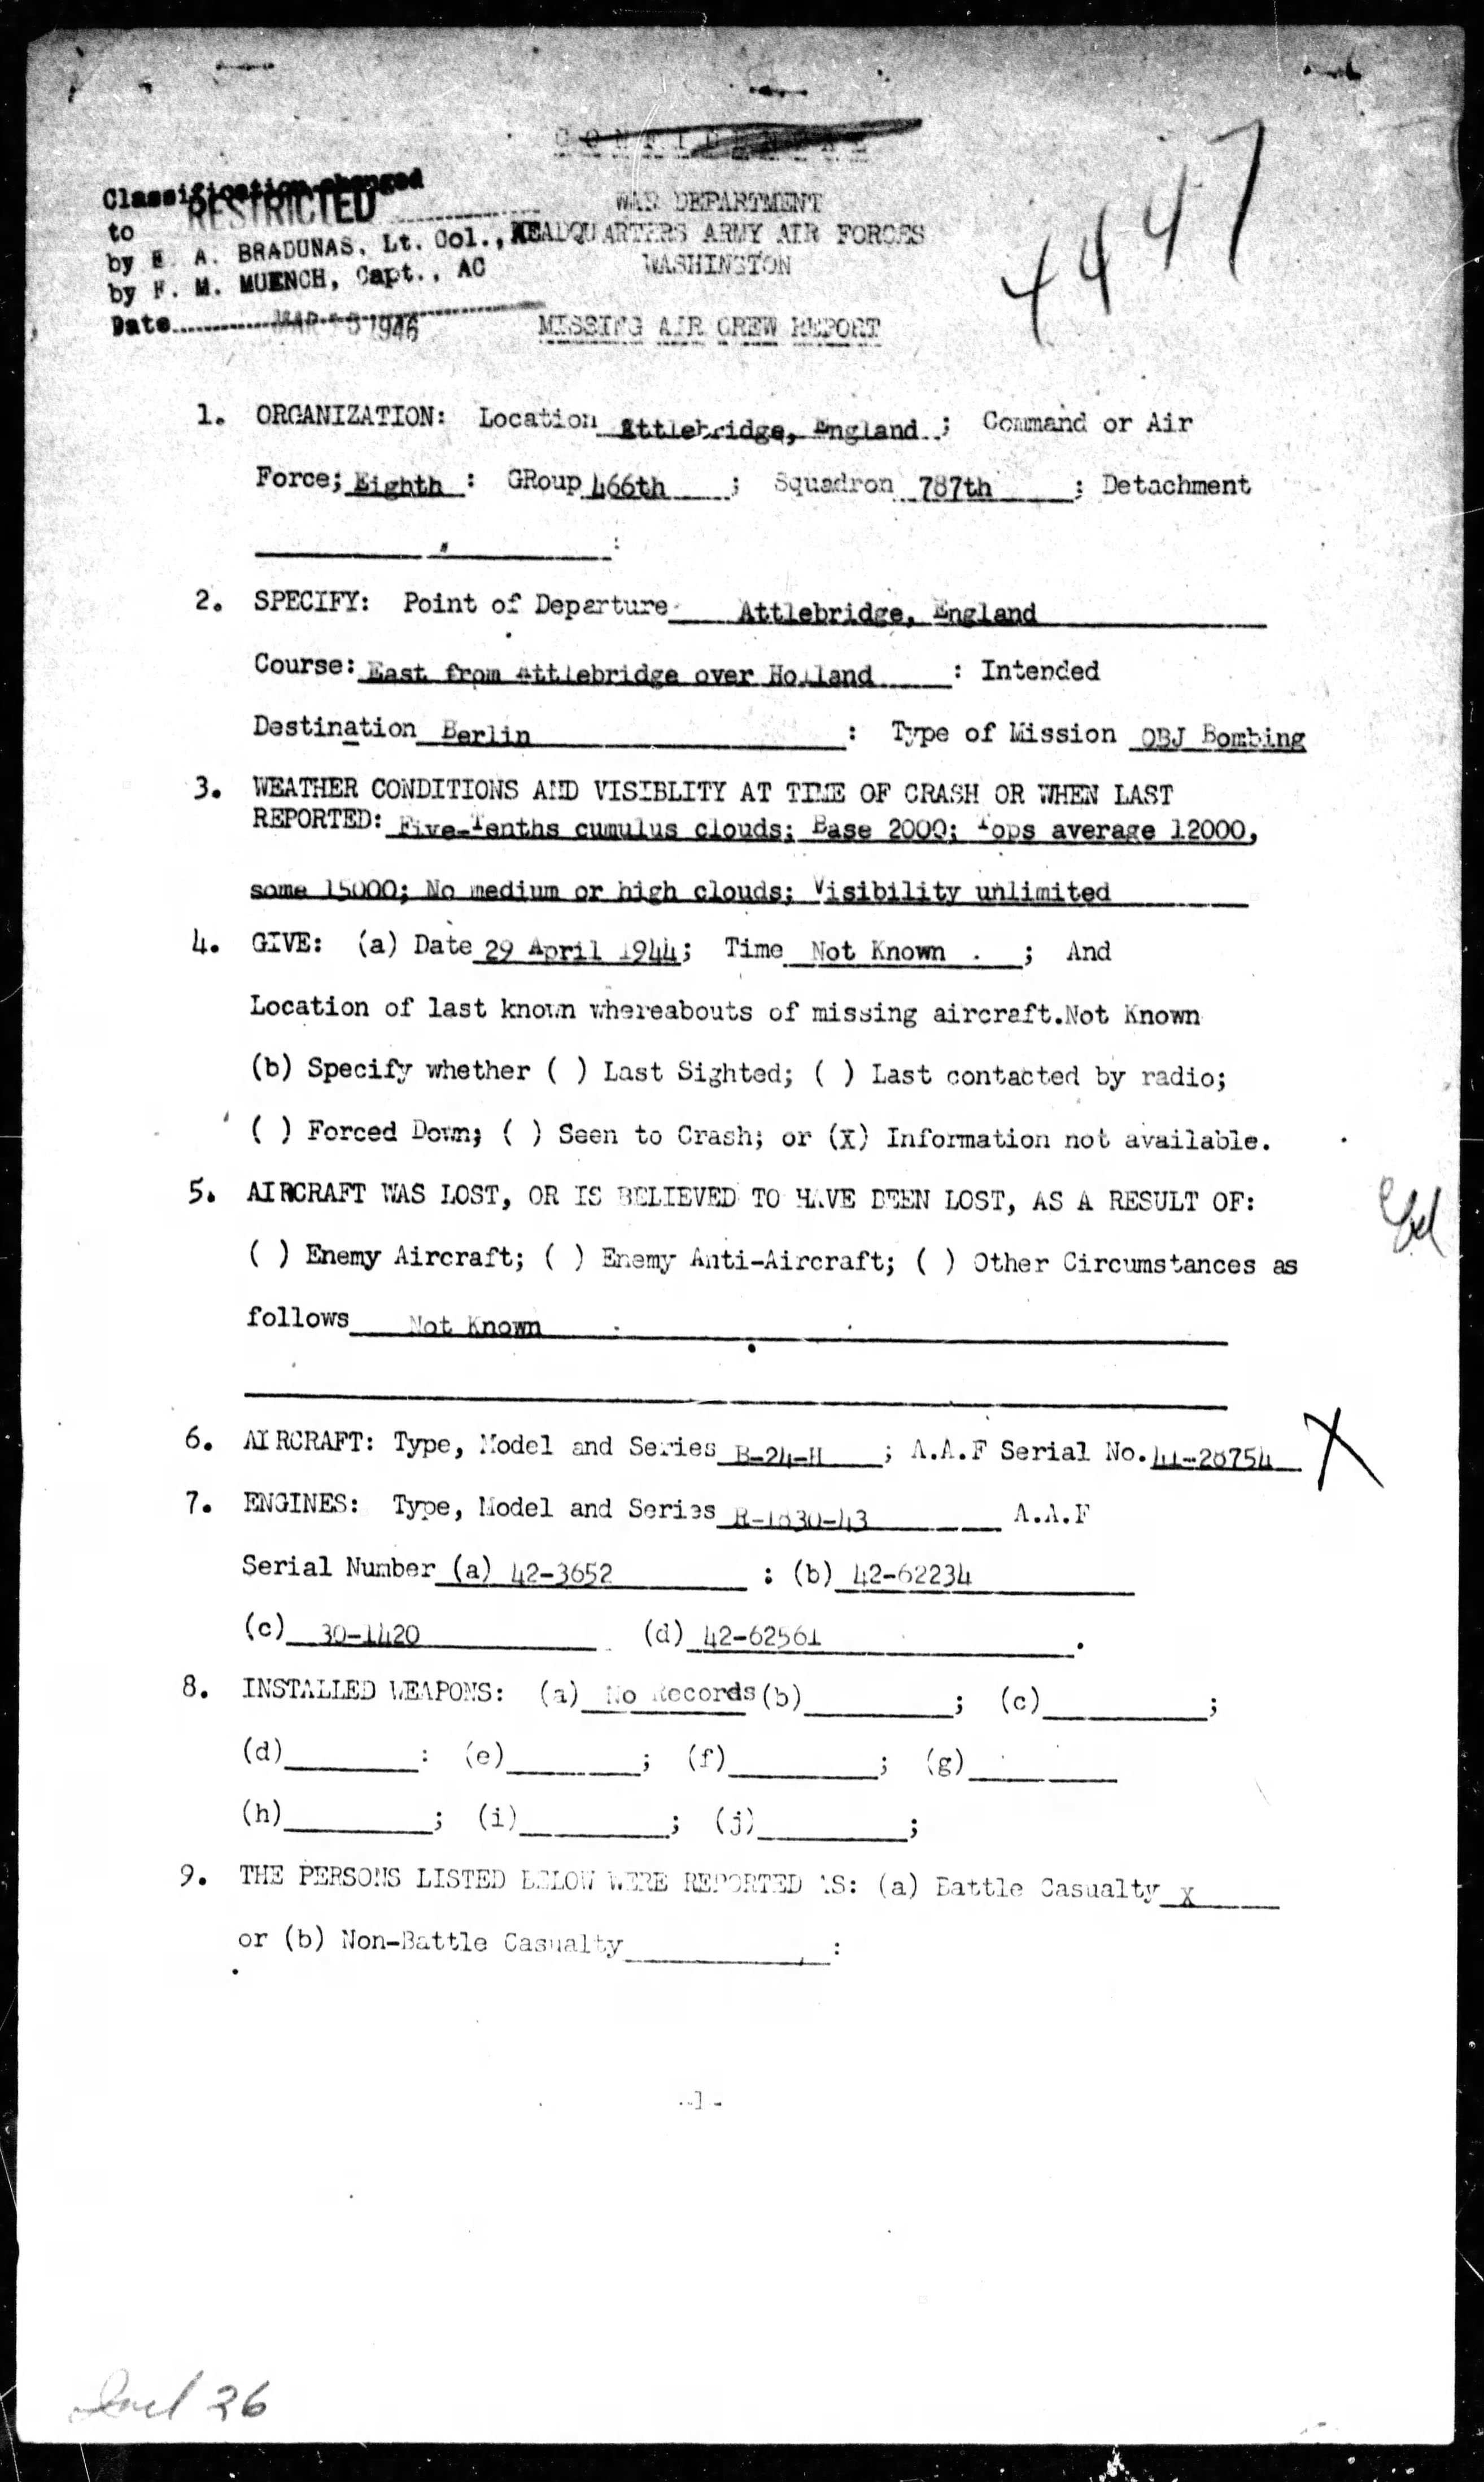
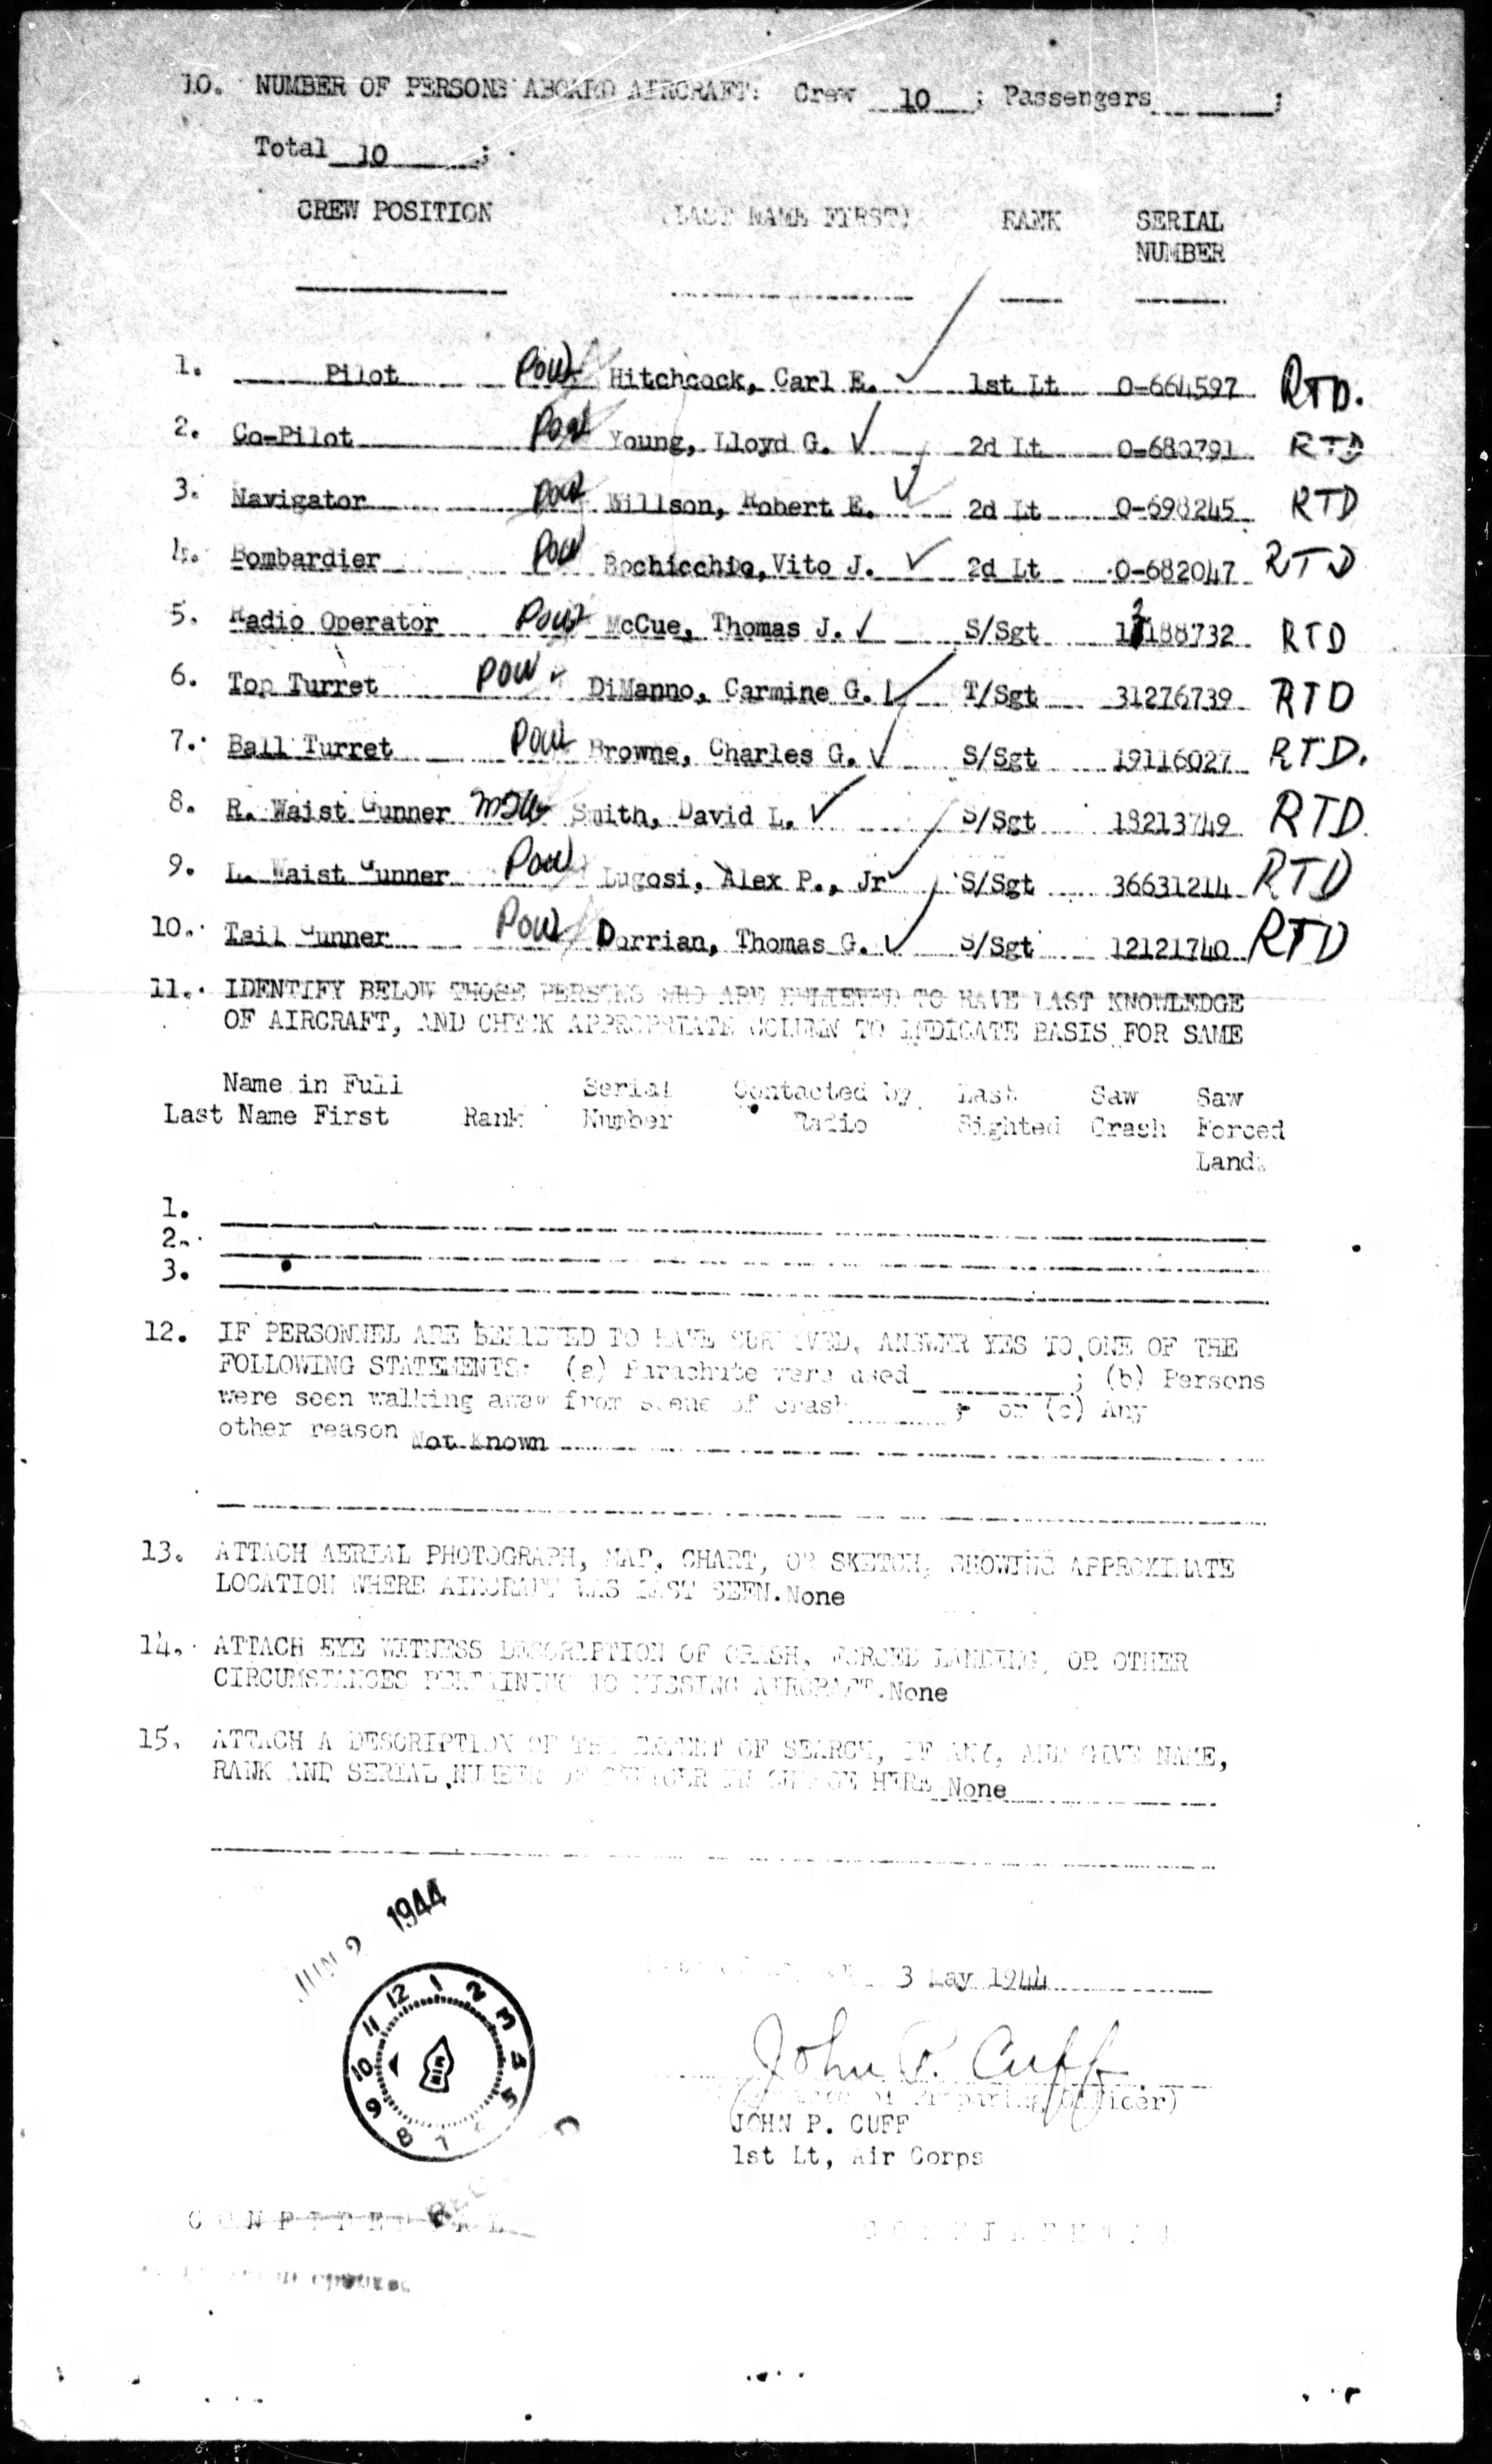
B-24H 41-28754
American Air Museum in England
8th Air Force Historical Society
Luftgaukommando Report KU 1680
United States National Archives – Collection of Foreign Record Seized – Record Group 242: “Records of Luftgaukommandos: German Reports of Downed Allied Fighters and Other Aircraft – KU Reports”
Report KU 1680 at NARA: (In) Records Group 242, Entry 1022, Shelf Location 190 / 14 / 9-12 / 1-5, Box 231
Demonstration of Emerson A-15 Turret
Modelling the B-24H Liberator